Migrate from AList V3
DANGER
Smooth migration is not compatible with Alist v3.46 and higher versions. If you want to migrate, please avoid upgrading to a higher version.
DANGER
不兼容 Alist v3.46 及更高版本的平滑迁移,如需迁移请勿升级到更高版本。
1. Revoke Authorization for Alist API
1. 解除授权 Alist API
As the API service provided by the original author may have been taken over by a third party, there is a risk of information leakage or account bans. If you have concerns, it is recommended to revoke authorization or log in again to ensure your security.
Since it’s not possible to provide detailed steps for every platform, we invite helpful users to visit https://github.com/OpenListTeam/OpenList-Docs and share screenshots of the authorization revocation process.
The following content is provided by helpful online users in OpenListTeam/OpenList-Docs#5 and OpenListTeam/OpenList-Docs#6. We thank them for their contributions!🙏✨💖
由于原作者提供的 API 服务可能已被第三方控制,存在信息泄露或账号封禁的风险。如果您对此有所顾虑,建议解除授权或重新登录以确保安全。
由于无法对各平台一一截取详细流程,欢迎各位热心网友前往 https://github.com/OpenListTeam/OpenList-Docs 提供解除授权的流程截图。
以下内容由热心网友提供(OpenListTeam/OpenList-Docs#5、OpenListTeam/OpenList-Docs#6),特别感谢!🙏✨💖
The following methods only apply to cloud drives mounted using officially supported Open API methods.
以下方法仅适用于采用 Open API 官方支持的方式挂载的网盘。
Quick overview of how to revoke authorization for each cloud drive ♿️
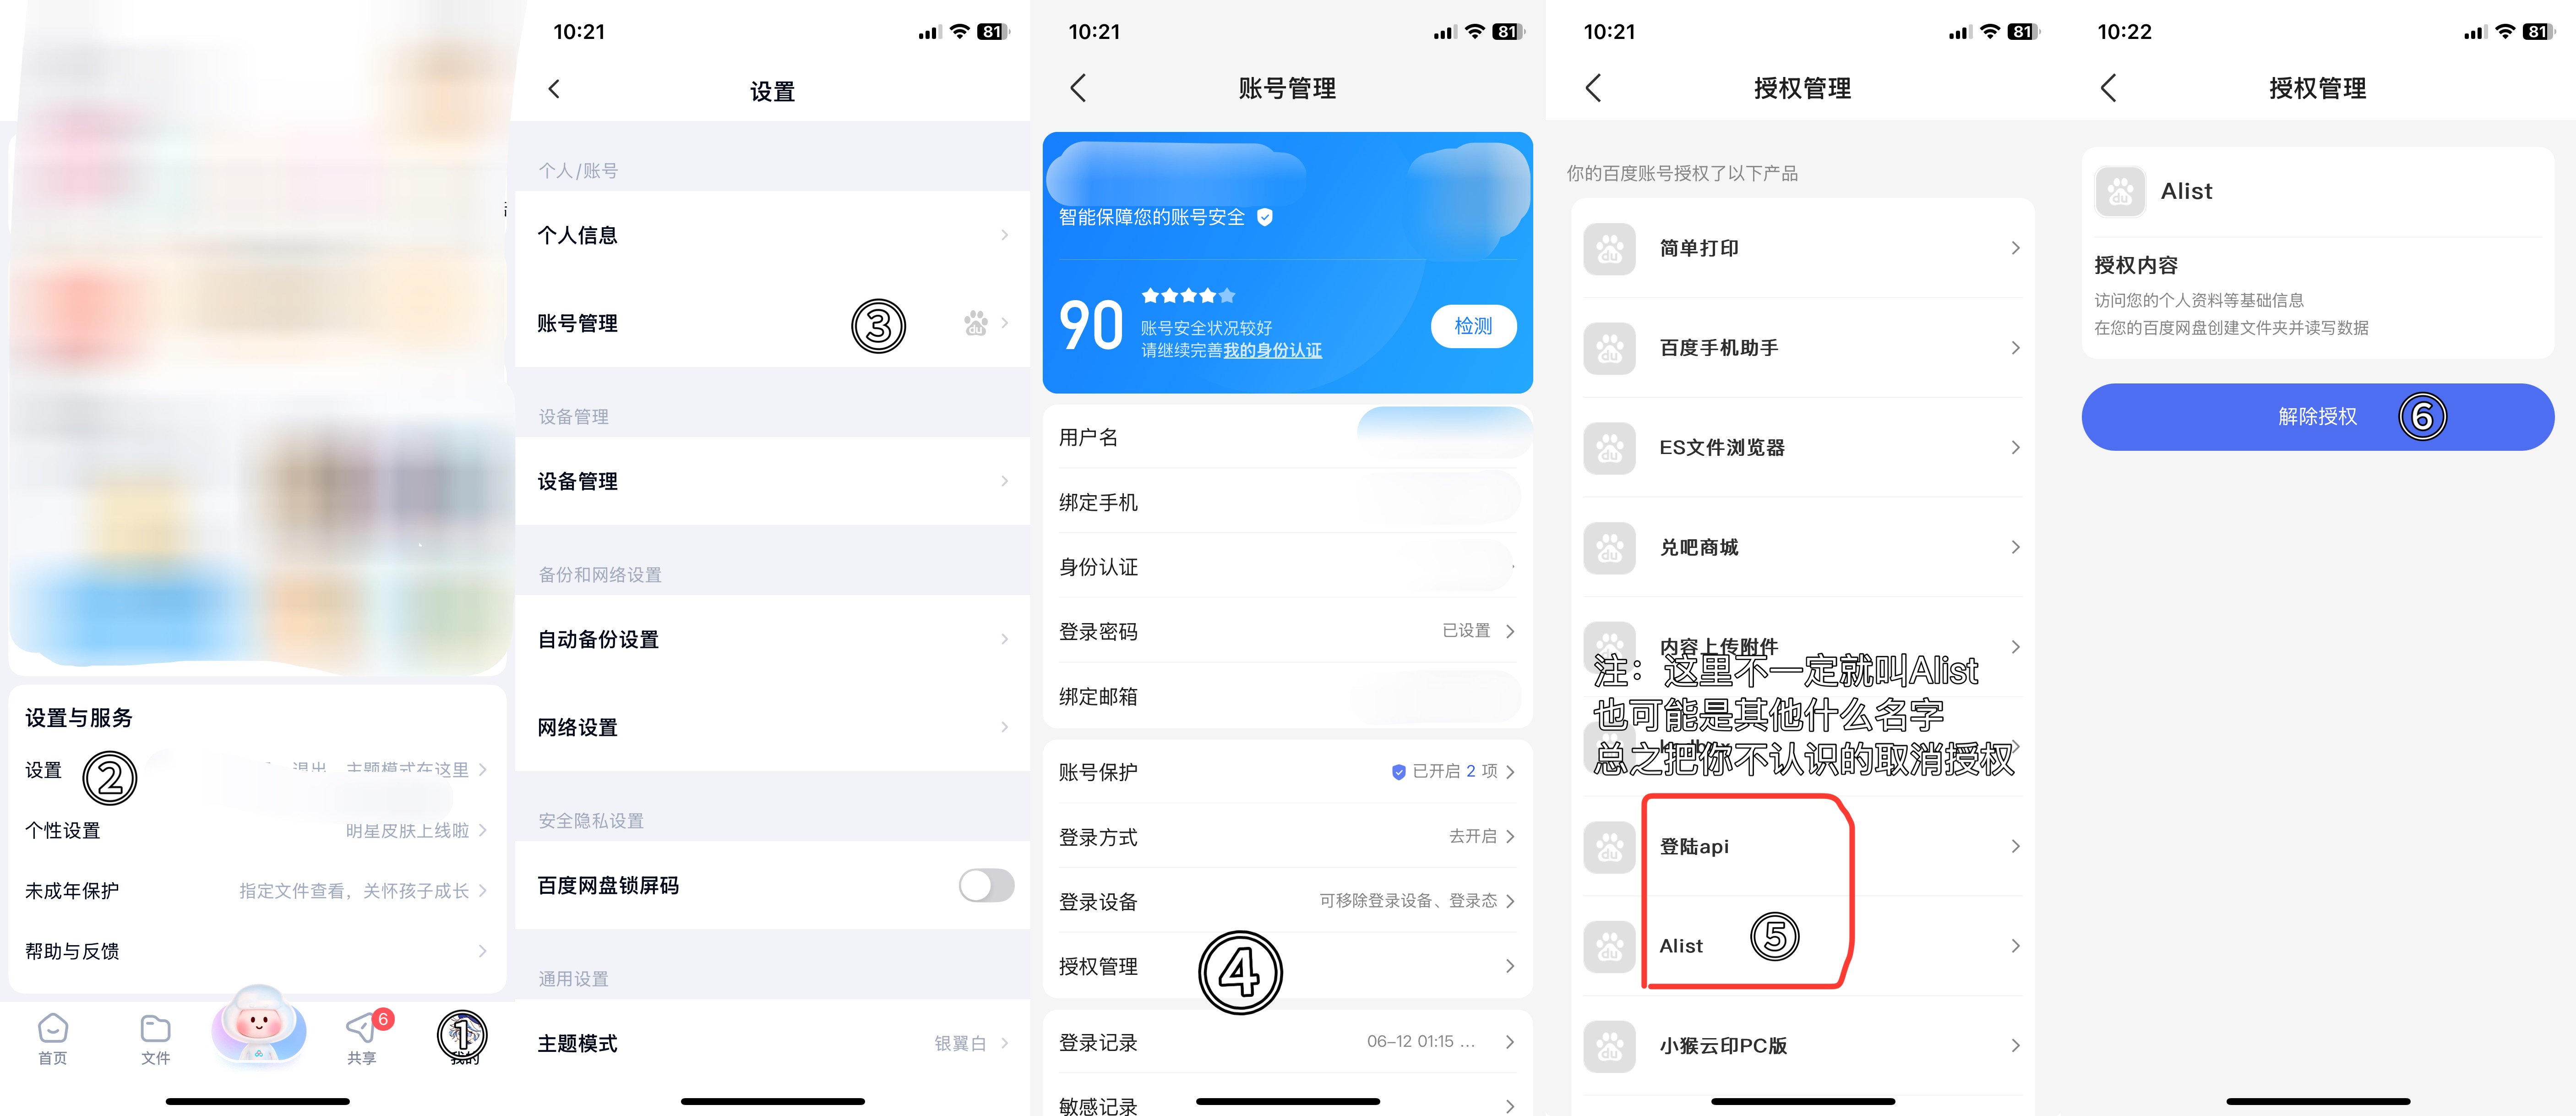
- Baidu Netdisk App - My - Settings - Account Management - Authorization Management - Alist - Revoke Authorization
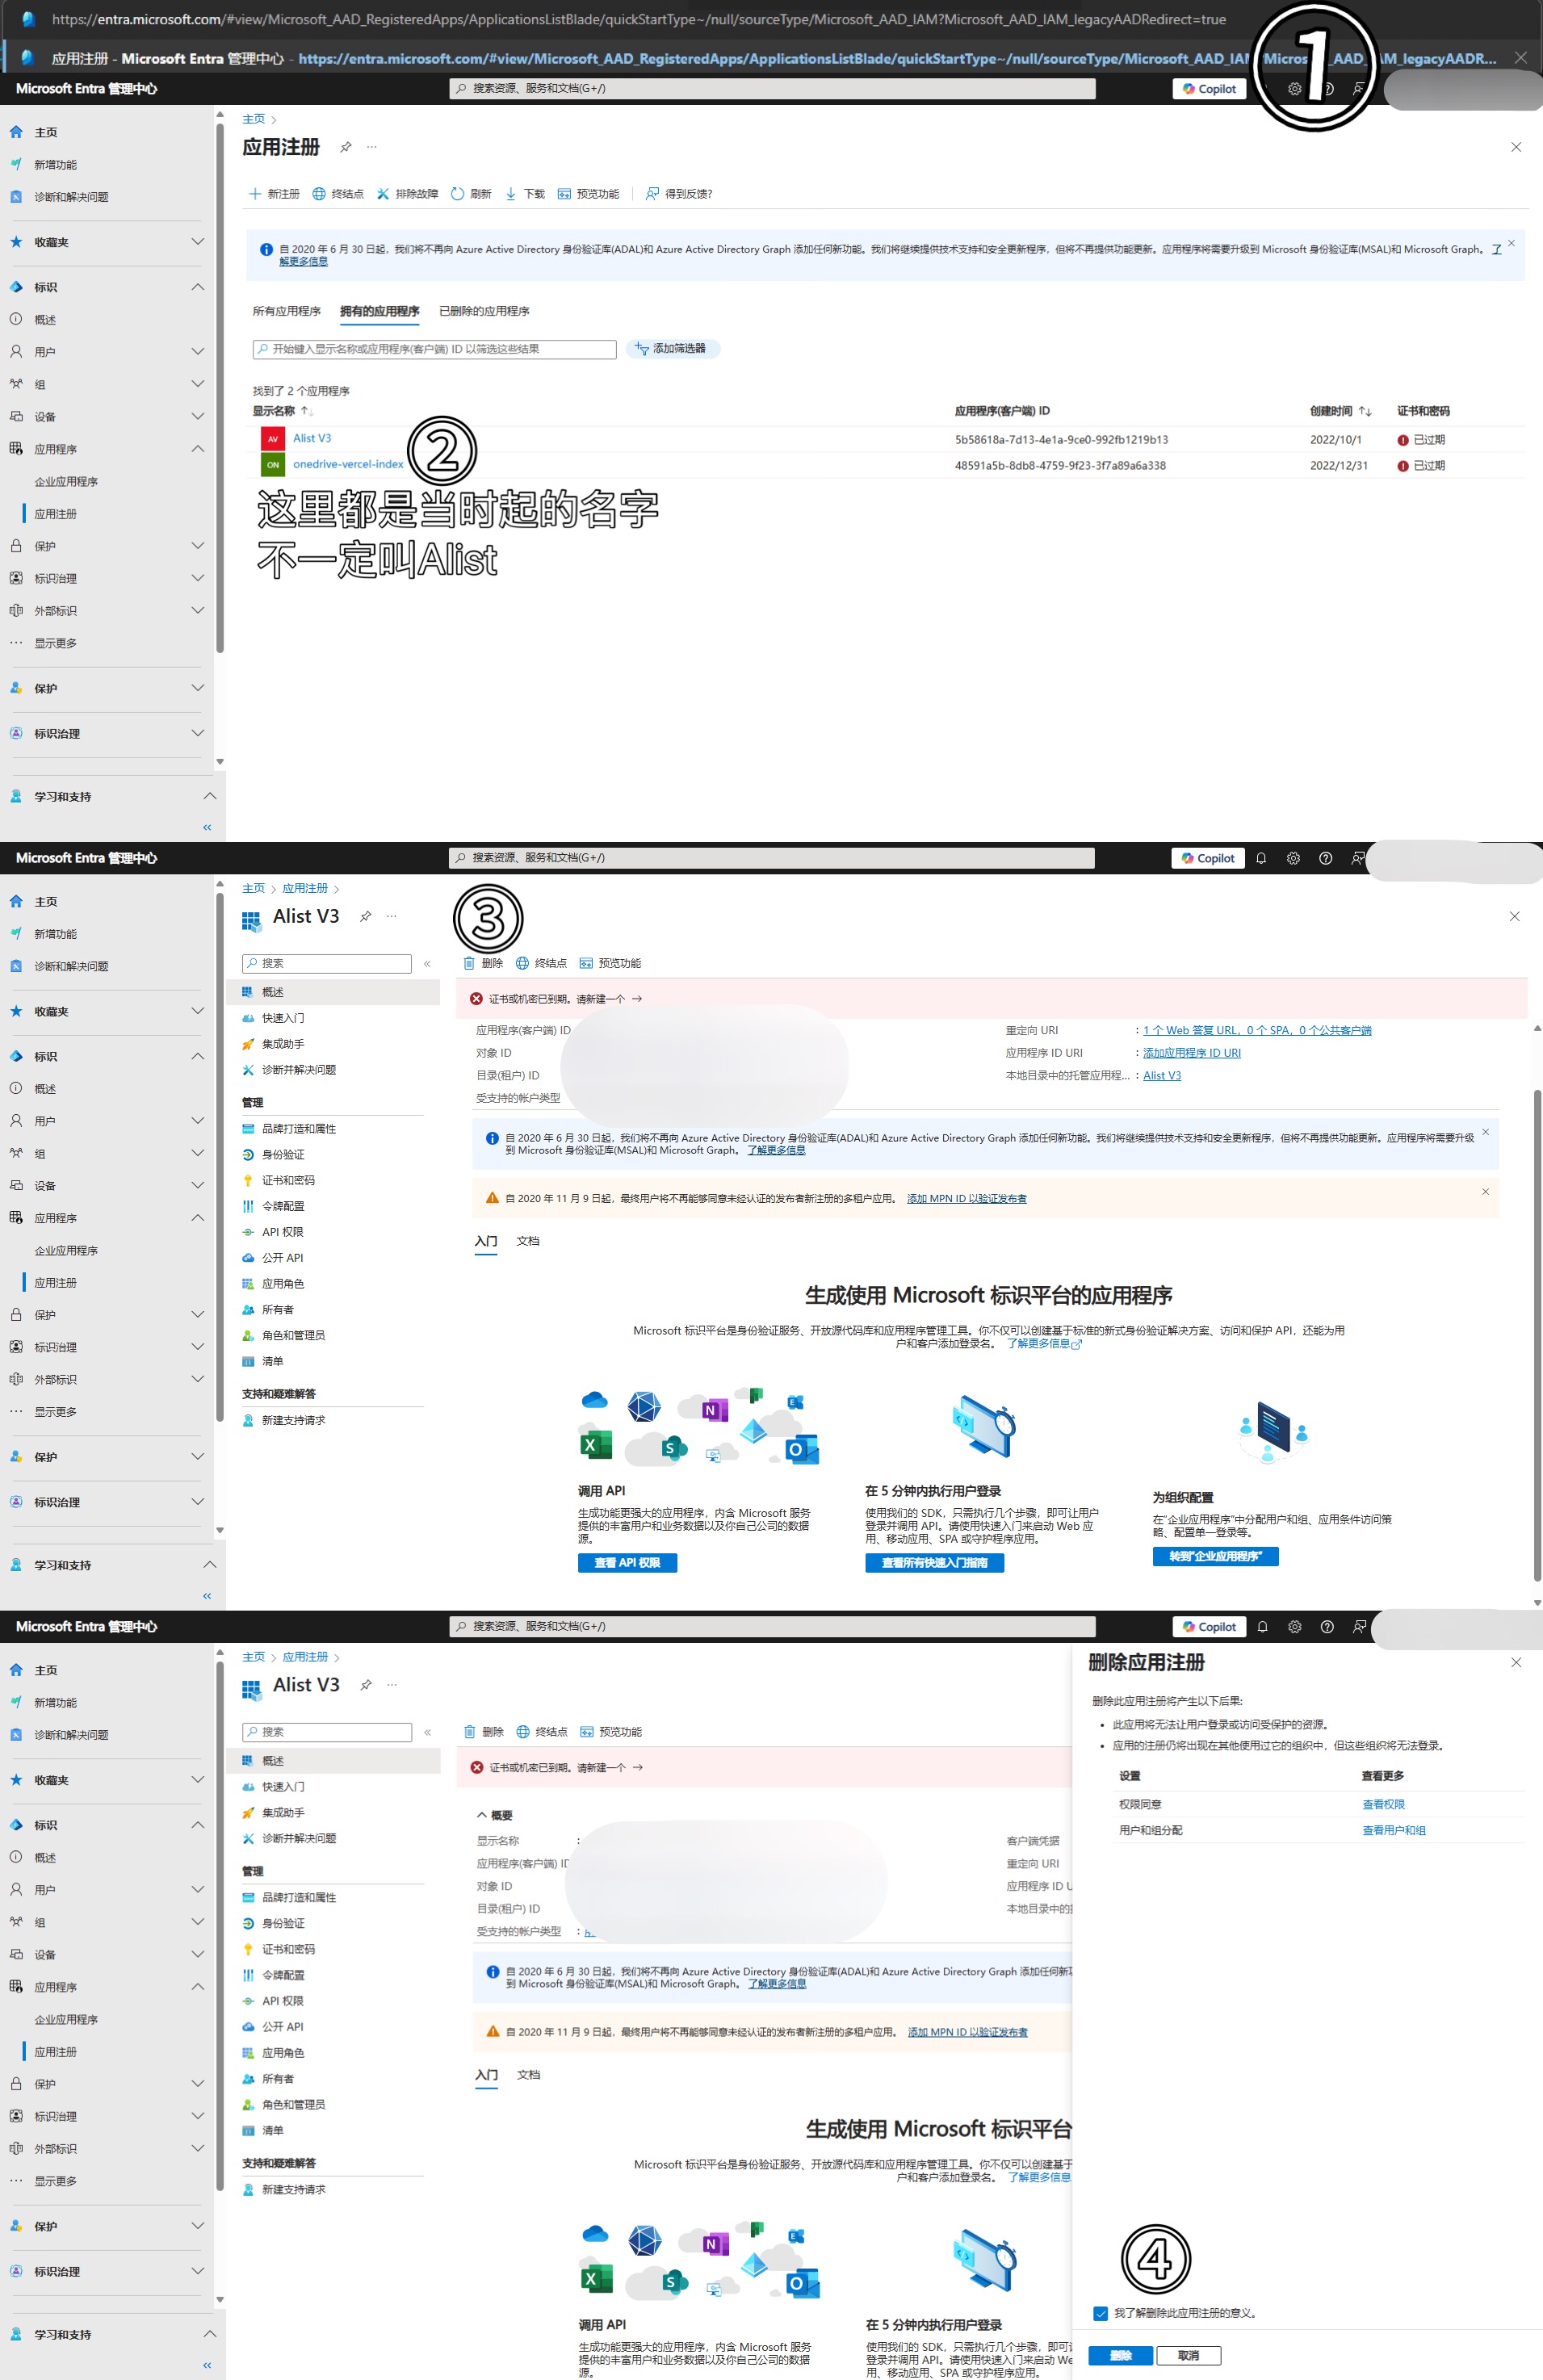
- Aliyun Drive - My - Upper right gear icon - Privacy Settings - Authorization Management - Alist - Revoke Authorization
- 115 APP - Life (scroll down) - Account & Security - Multi-device Login Management - Third-party Login
- China Unicom Cloud - Check login account on webpage - Future recommendation: follow tutorial for packet capture login
- Baidu Photo - Avatar - App Settings - Account Management - Authorization Management
- JianGuoYun - Upper left three lines - Settings - Third-party App Management - Revoke Authorization
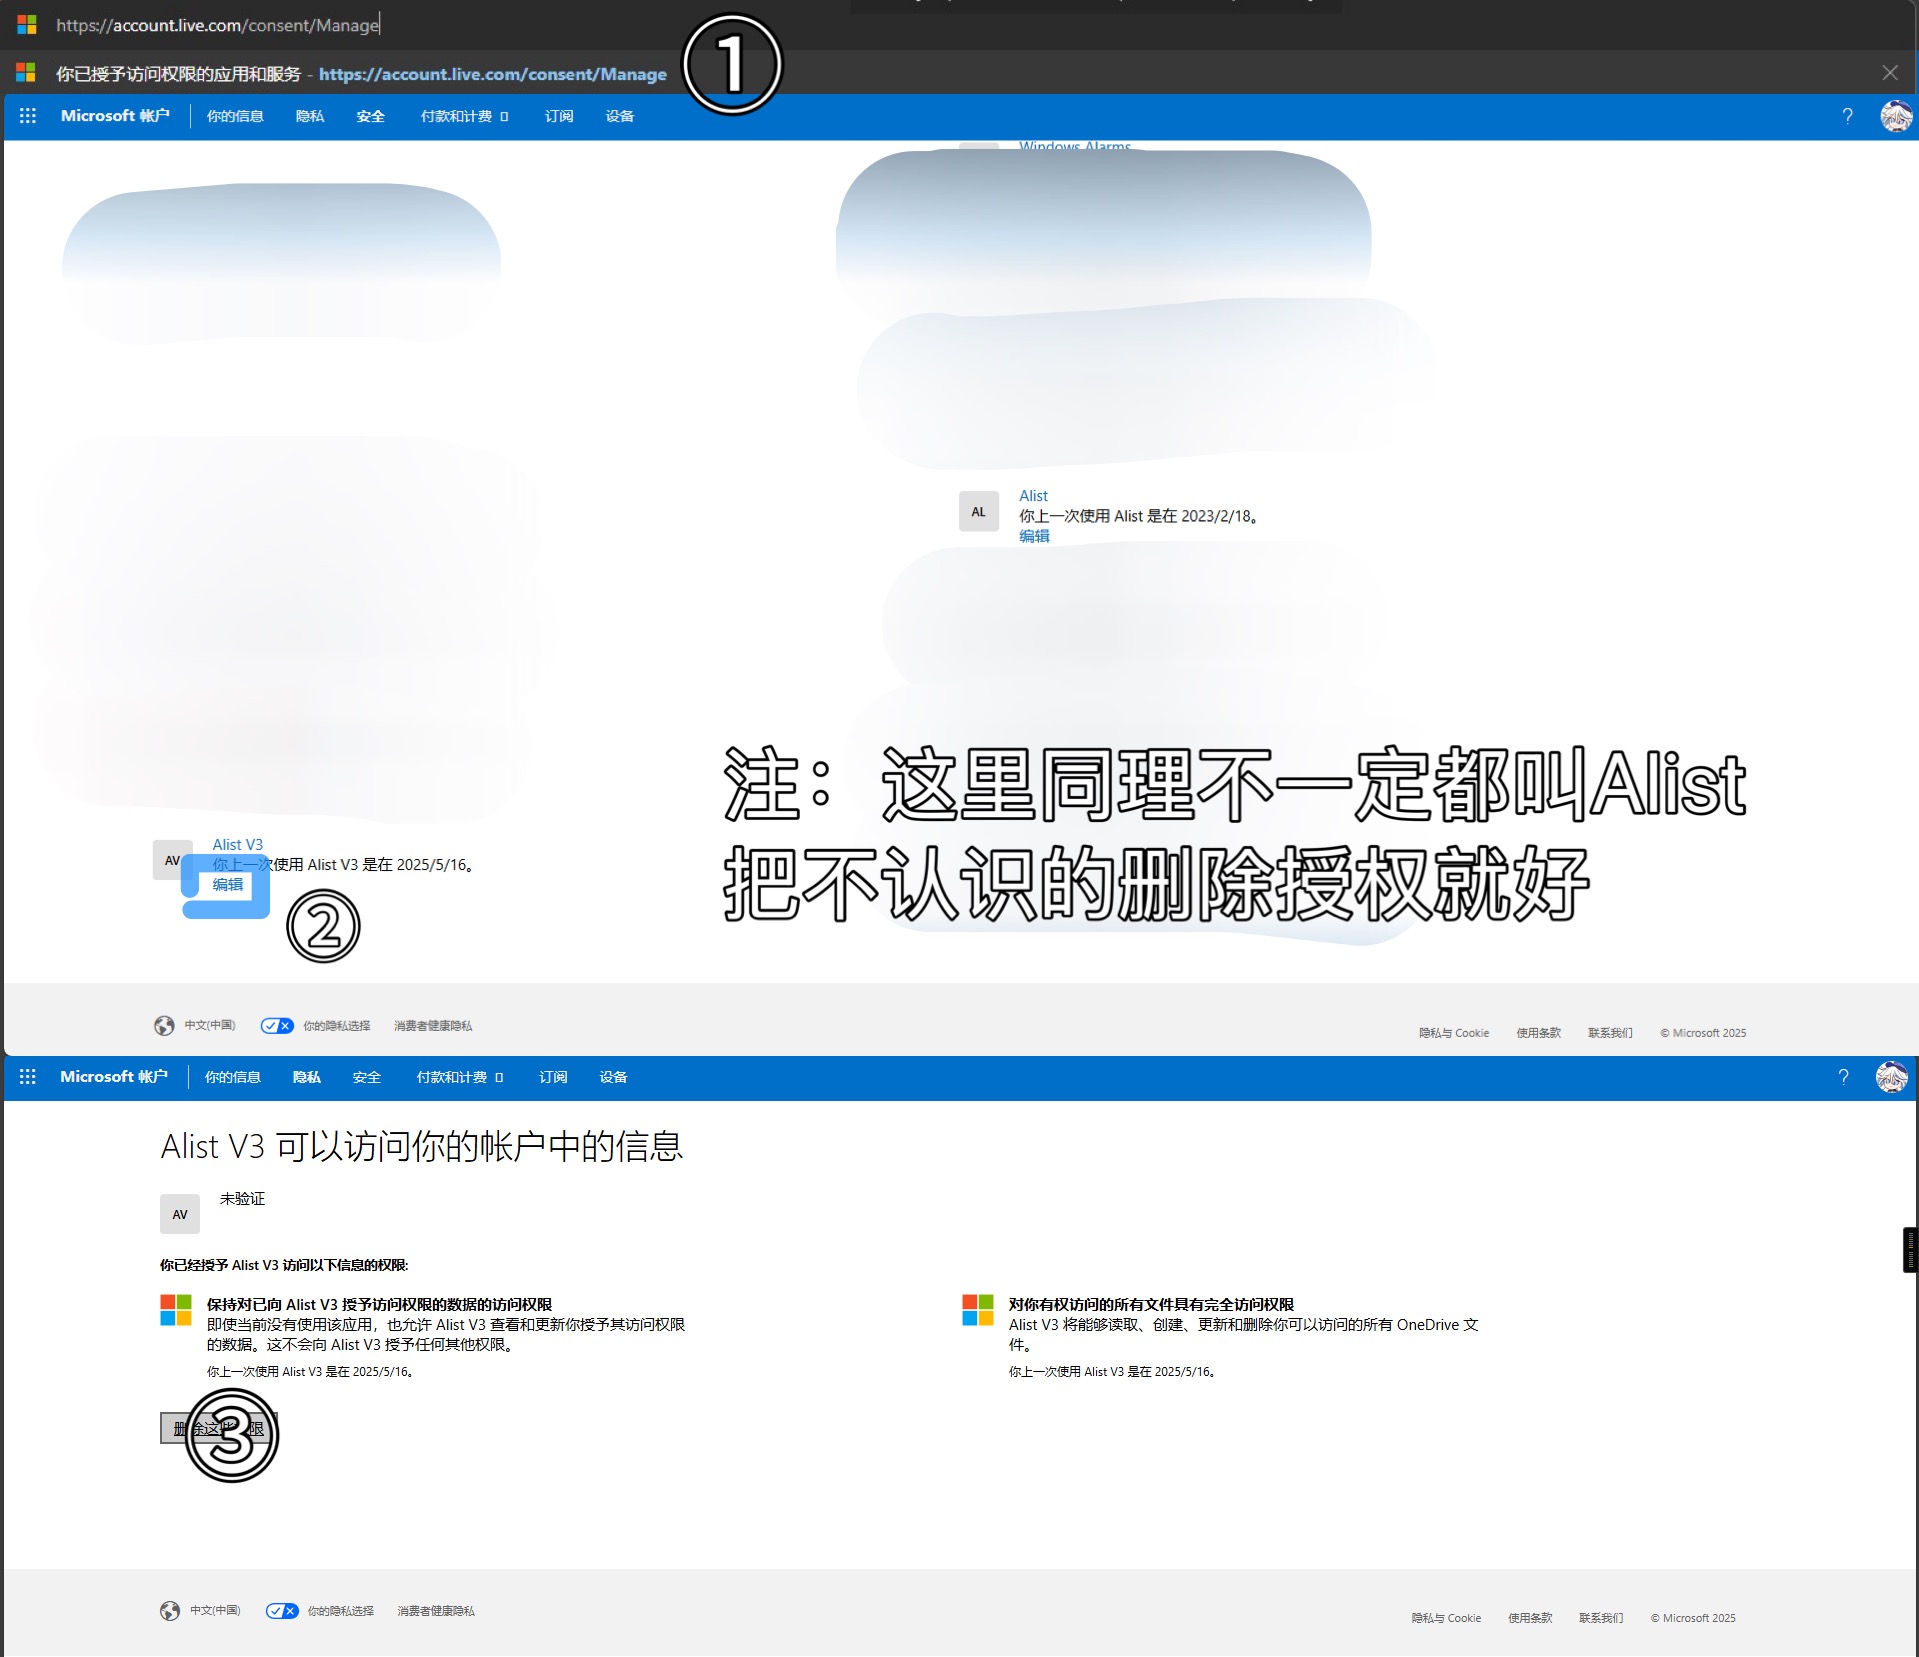
- OneDrive - https://account.live.com/consent/Manage - Revoke Authorization
速览各网盘解除授权方式 ♿️
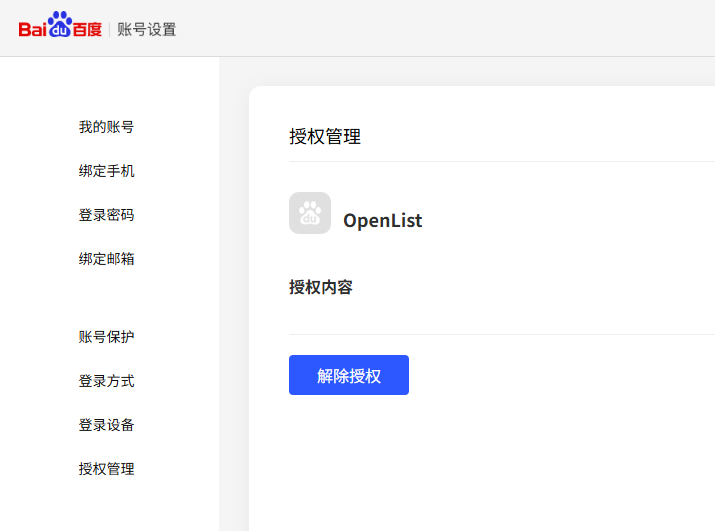
- 百度网盘App - 我的 - 设置 - 帐号管理 - 授权管理 - Alist - 解除授权
- 阿里云盘 - 我的 - 右上齿轮 - 隐私设置 - 授权管理 - Alist - 解除授权
- 115APP - 生活 下滑 - 账号与安全 - 多端登录管理 - 第三方登录
- 联通云盘 - 在网页查询登录账号 - 以后建议按照教程抓包登录
- 一刻相册 - 头像 - 应用设置 - 账号管理 - 授权管理
- 坚果云 - 左上角三横杠 - 设置 - 第三方应用管理 - 撤销授权
- OneDrive - https://account.live.com/consent/Manage - 解除授权
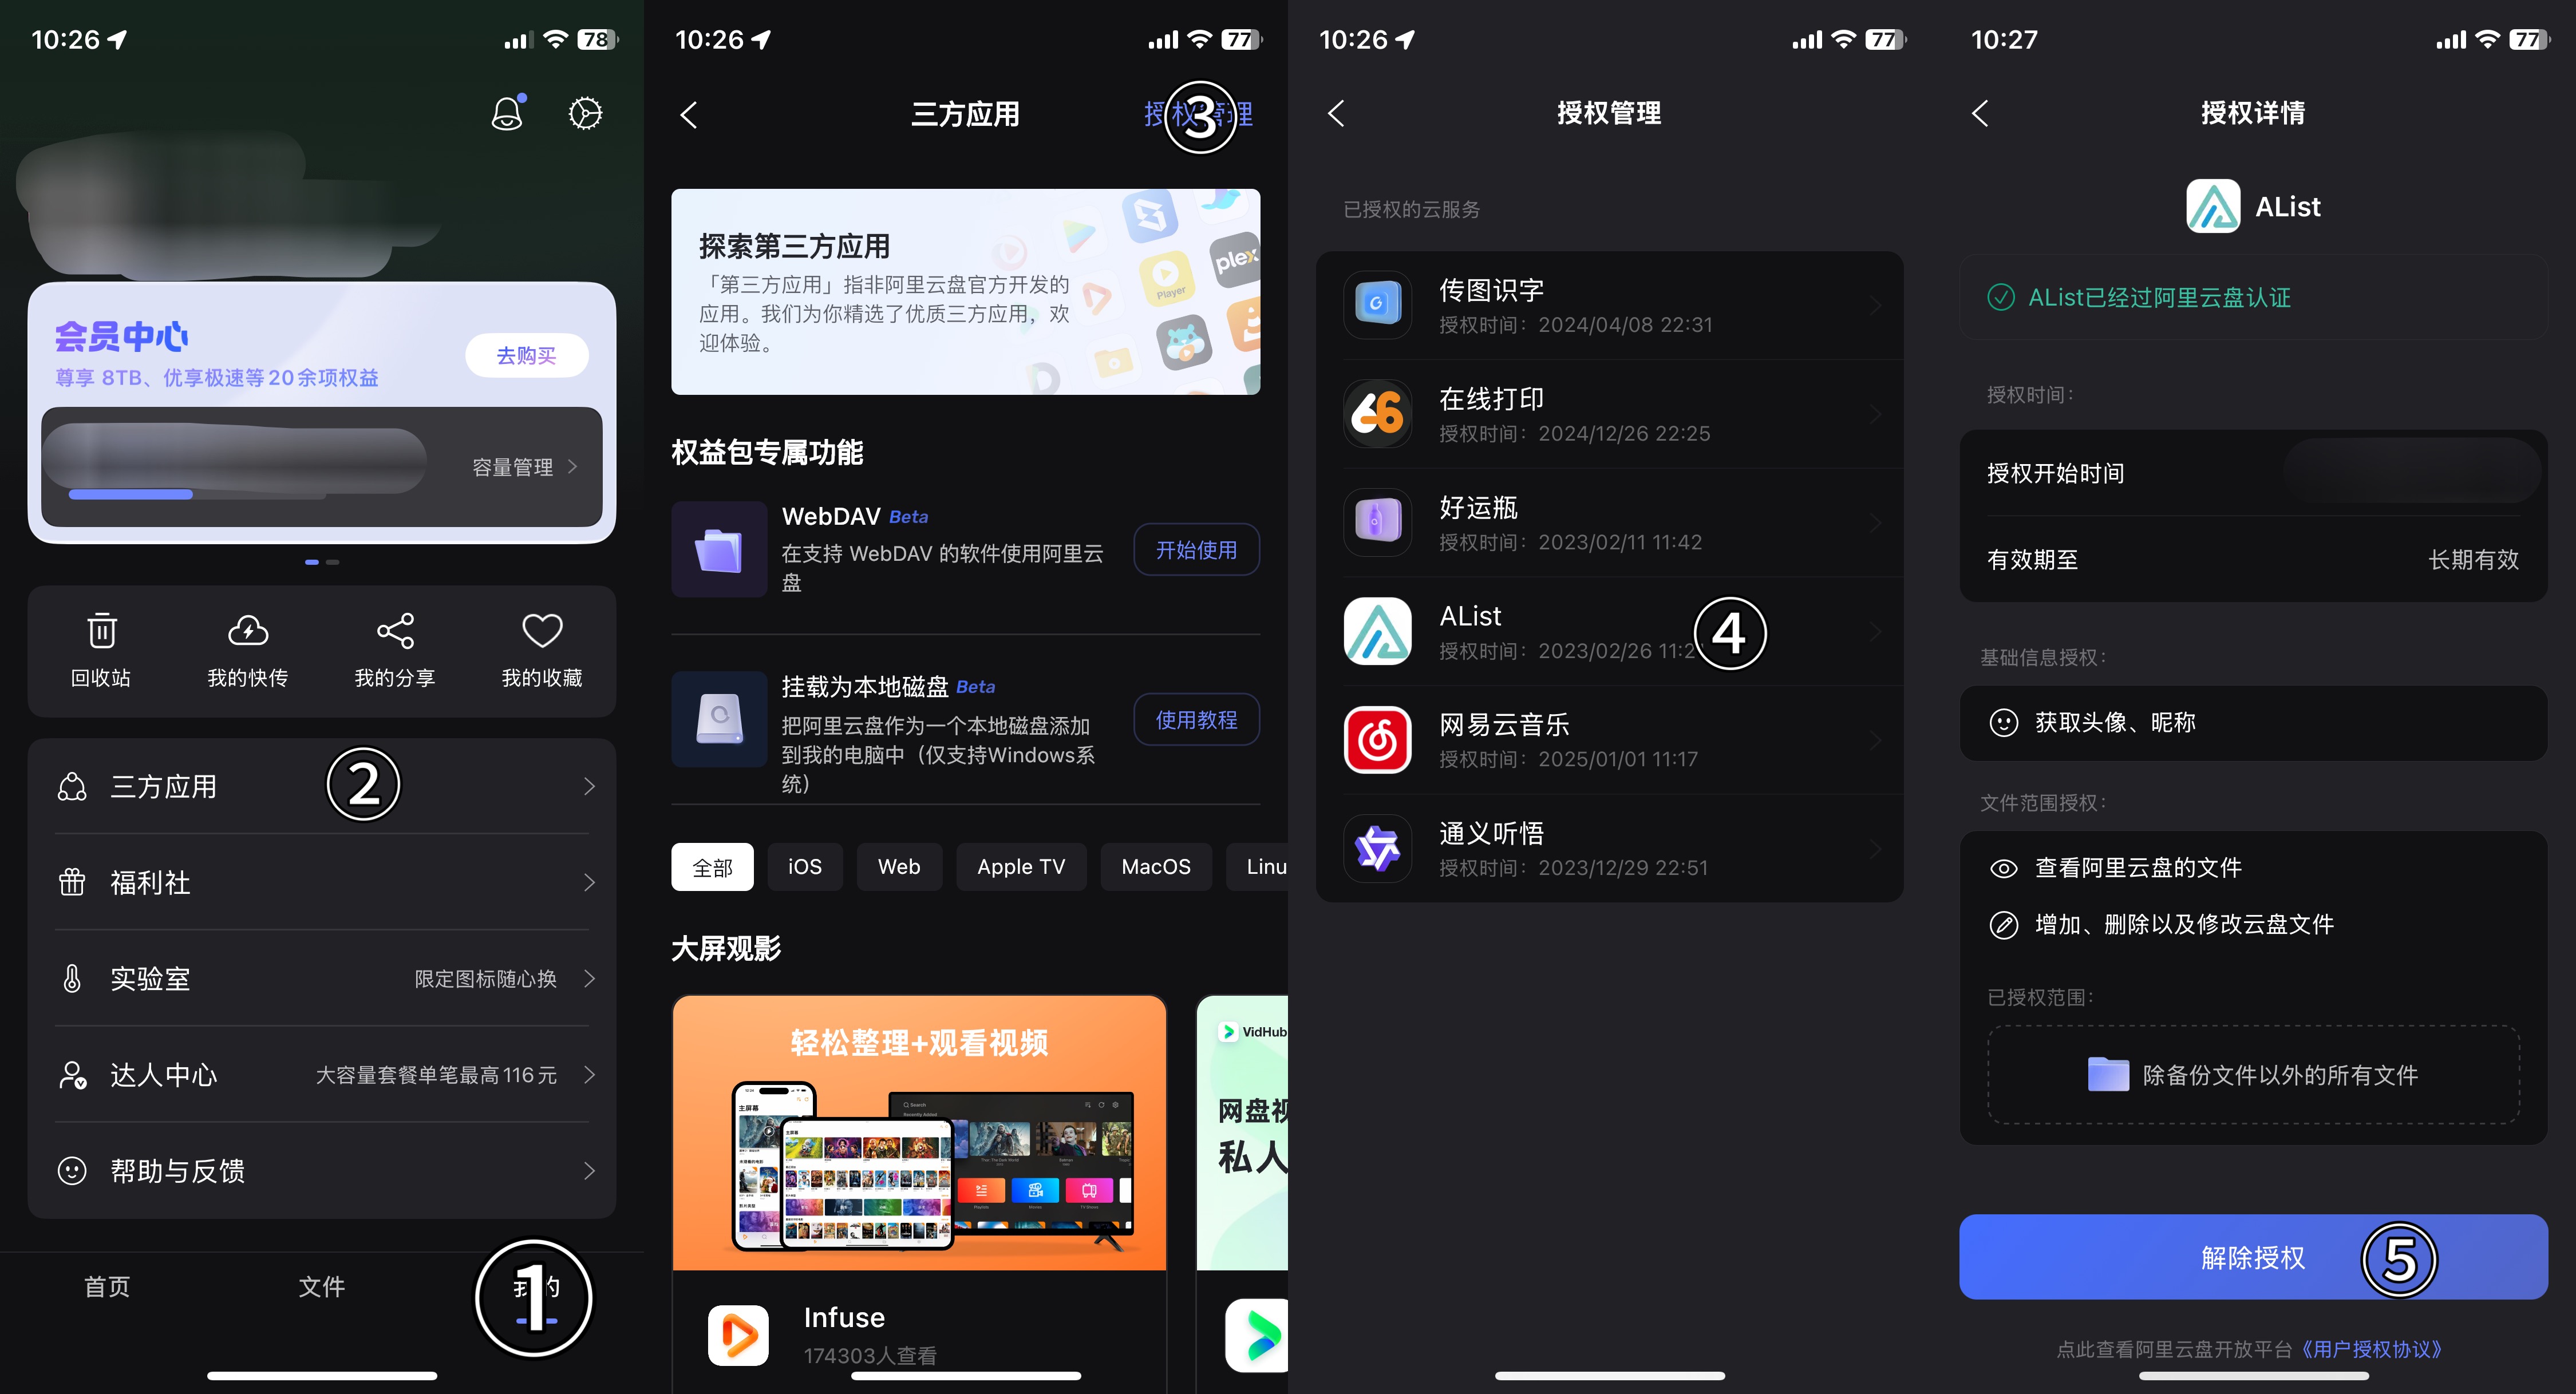
Aliyun Drive
阿里云盘
- Log in to Aliyun Drive
- Visit the link: https://www.alipan.com/o/oauth/auth-list
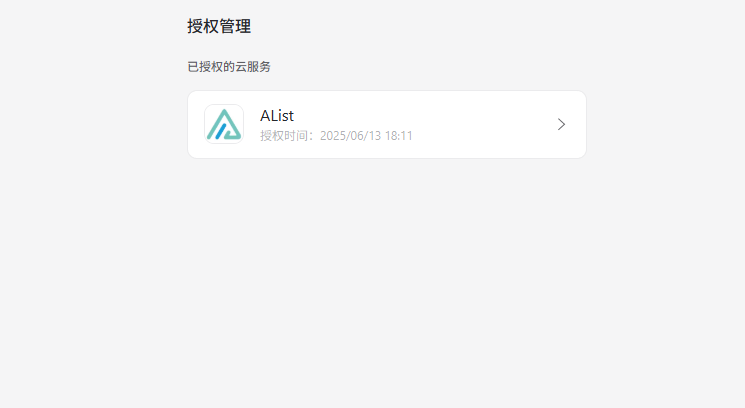
- Find Alist under “Authorized Cloud Services,” click to enter, then click "Revoke Authorization"
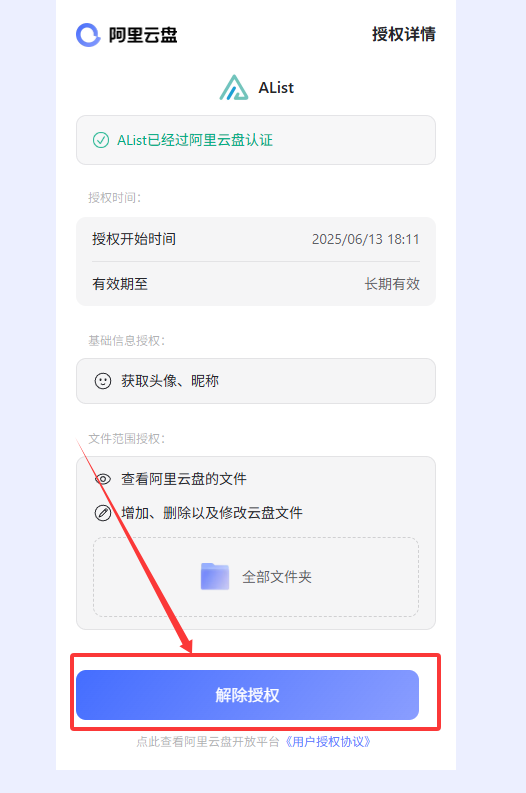
- Successfully revoked
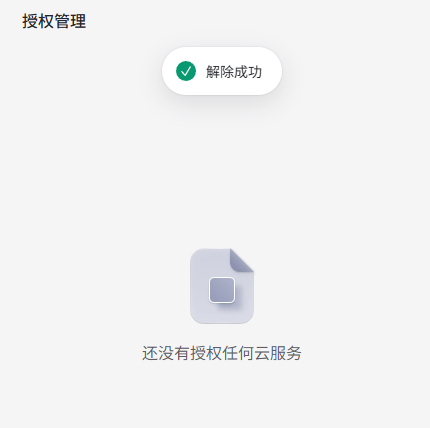
- 登陆阿里云盘
- 访问链接 https://www.alipan.com/o/oauth/auth-list
- 在 “已授权的云服务” 中找到 Alist,点击进入后点击 “解除授权”
- 解除成功
Aliyun Drive APP
阿里云盘 APP
Baidu Netdisk
百度网盘
- Log in to Baidu Netdisk
- Visit the link: https://passport.baidu.com/v6/appAuthority

- Find Alist in Authorization Management, click to enter, then click "Revoke Authorization"
- Successfully revoked
- 登陆百度网盘
- 访问链接 https://passport.baidu.com/v6/appAuthority
- 在授权管理中找到 Alist,点击进入后点击 “解除授权”
- 解除成功
Baidu Netdisk APP
百度网盘 APP
OneDrive Business
OneDrive 商业版
OneDrive Personal
OneDrive 个人版
Link: https://account.live.com/consent/Manage
Google Drive
Link: https://console.cloud.google.com

2. Backup Configuration Files
2. 备份配置文件
Use the Backup & Restore function to back up the configuration files to your local device.
Additionally, you will need to back up the data folder from Alist V3, which contains site configuration files and the database.
使用 备份&恢复 功能,将配置文件进行备份到本地。
此外,您还需要备份 Alist V3 的 data 文件夹,里面包含着站点的配置文件以及数据库。
3. Uninstall Alist V3
3. 卸载 Alist V3
Uninstall according to the method you used for installation.
根据您安装的方式进行卸载。
4. Install OpenList
4. 安装 OpenList
Follow the instructions provided in the documentation to install OpenList.
通过文档提供的方式安装 OpenList。
DANGER
If you are using Docker for deployment, make sure to modify the Volume mapping by changing the configuration file path from /opt/alist/data to /opt/openlist/data. Otherwise, your configuration files will be lost after updating the version and rebuilding the container!
In addition, it is recommended to delete the previous container and then recreate it to avoid failure to run due to environmental changes.
DANGER
如果您使用 Docker 部署,请确保修改 Volume 映射,将配置文件的路径从 /opt/alist/data 修改为 /opt/openlist/data。否则,更新版本、重建容器后您的配置文件将丢失!
此外,建议删除之前的容器,然后重新创建,避免环境变化导致无法运行。
5. Restore Configuration Files
5. 恢复配置文件
If your Alist V3 version is below v3.46, you can migrate directly—keeping the previous data folder and only replacing the OpenList binary files.
Otherwise, use the Backup & Restore function to restore the backed-up configuration files to OpenList.
如果您的 Alist V3 版本低于 v3.46,正常情况下,您可以直接迁移——即保留之前的 data 文件夹,仅替换 OpenList 的二进制文件。
否则,请使用 备份&恢复 功能,将备份的配置文件恢复到 OpenList。
6. Reset Settings
6. 重置设置
Once in OpenList’s admin panel, on each settings page, click the Load Default Settings button at the bottom, then click Save.
进入 OpenList 后台,在设置的各个页面下,点击下方的 加载默认设置,然后 保存。