OneDrive APP
Benefits and Precautions
好处以及注意事项
- The advantage is that the administrator is only authorized to log in once, and the same is used when adding parameters later. When adding, everything is the same except for the mailbox.
- For example, E5 has 25 5T accounts. After you log in and initialize in advance, you can directly use the parameters before the CV. You don’t have to get the refresh token every time as before, and it will expire after a long time
- A1, A1P, etc. can distribute more accounts (500 - unlimited)
- After the administrator authorizes in this way, he can view the account of each member in the organization at will, which will leak his own files
- It is recommended to apply for OneDrive E5 to get better
- 好处是只授权一次管理员登录,后续添加参数时用一样的,在添加时除了邮箱哪里不同,别的都一样
- 例如E5 25个5T的账号,你提前登录初始化完毕后,直接CV之前的参数即可,不用像以前一样每次都得去获取刷新令牌时间一长还失效
- A1 A1P等可以分发的账号更多(500 - 无限)
- 这样的方式管理员授权后,可以随意查看组织中每个成员的账号,泄露了自己的文件
- 建议自己申请 OneDrive E5 去好一些
TIP
It is not applicable to the home version. If you are in the configuration process, it does not match the options that appear in the tutorial. It may not be supported
TIP
不适用于家庭版,如果你在配置过程中,与教程中出现的选项不符可能是不支持
First log in with your personal or organizational account
Login to get our tenant ID
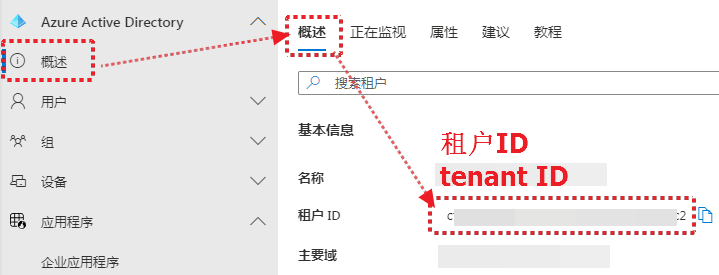
To log in to OneDrive (Operated by 21Vianet), please use this link
首先使用个人或者组织账号登录
登录后获取我们的 租户ID
世纪互联版本的 OneDrive 登录
Create process
新建过程
Read the precautions carefully
Please read carefully the following serial numbers , view in sequence , if there is any error, please feedback in time
请仔细阅读注意事项
请仔细阅读下面的 序号,依次查看 ,如有错误可及时反馈
- Register an application, choose the type yourself, it is recommended to choose the third
- Redirect URL (callback parameter), select Web as the type, and fill in the parameters https://entra.microsoft.com/TokenAuthorize ,Otherwise, it will not be able to authorize later. For OneDrive (Operated by 21Vianet), please use: https://entra.microsoftonline.cn/TokenAuthorize
- After filling out, click on the registration below and you can see it after jumping
client ID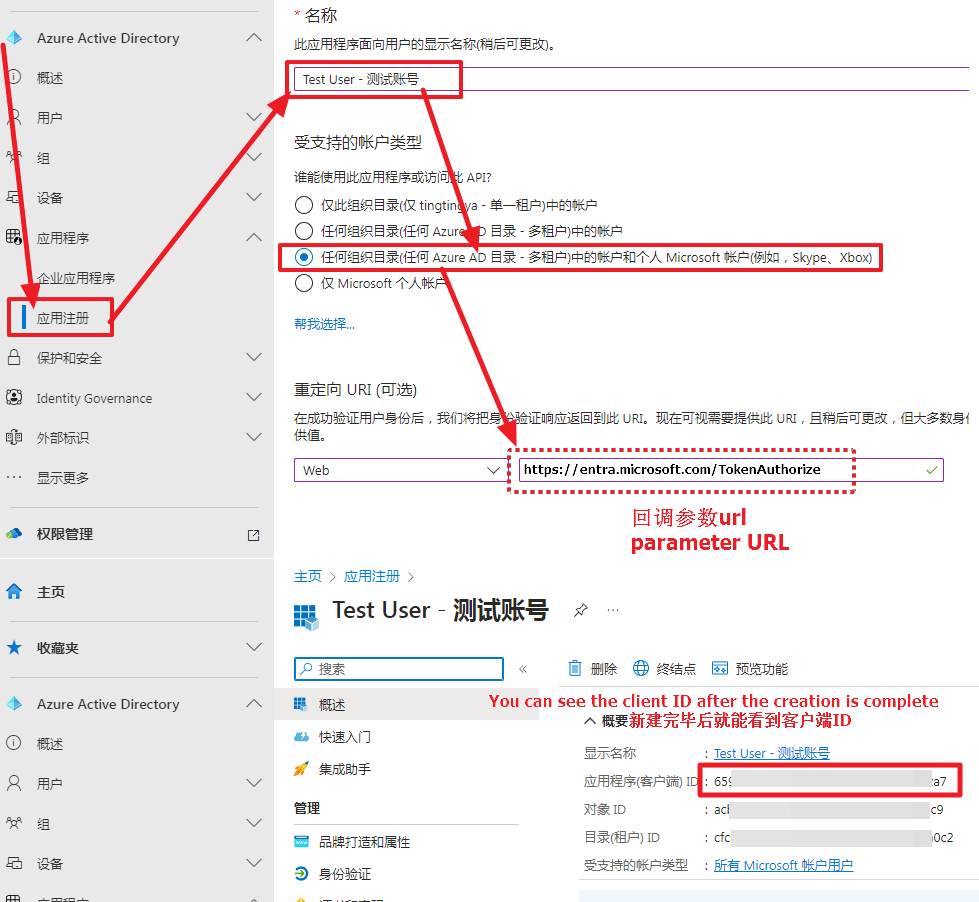
Let’s get a client secret key, just get it as shown in the figure below, remember secret key save in time, it will only appear once 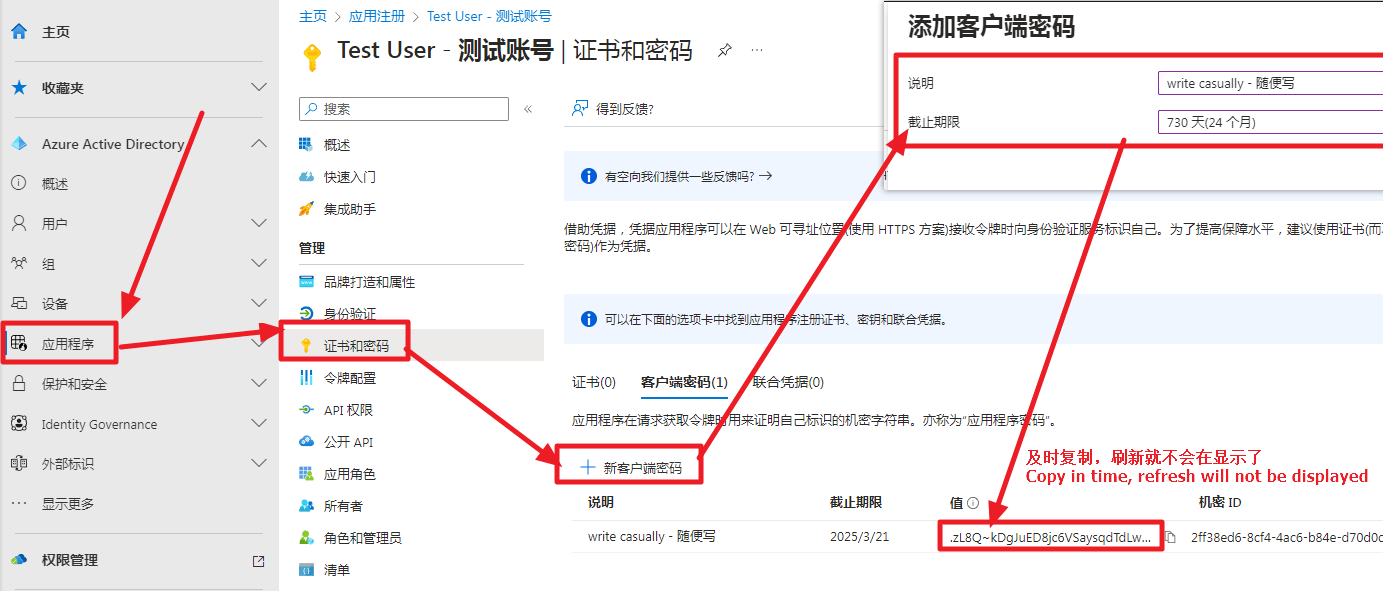
Once you have obtained the client secret key, go to authorize the API to be used, and follow the picture below to get it 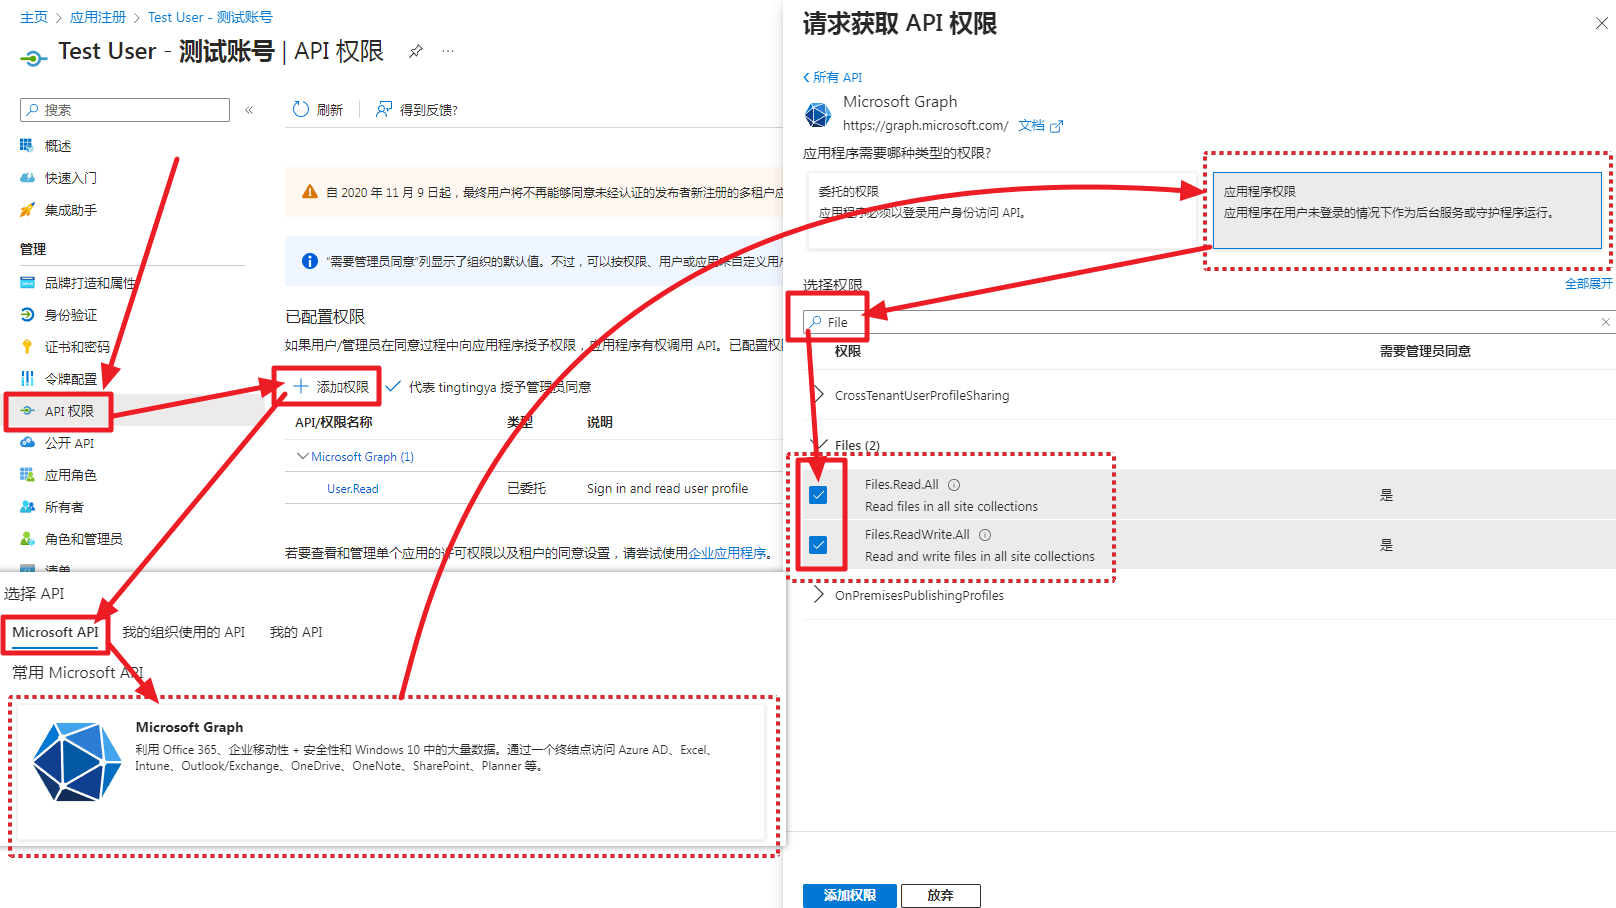
After the API is authorized, we go to authorize the organization application
- Left sidebar —> Enterprise applications —> All applications —> {choose which application name we started to create} —> Permissions —> Click for
xxxxGrant admin consent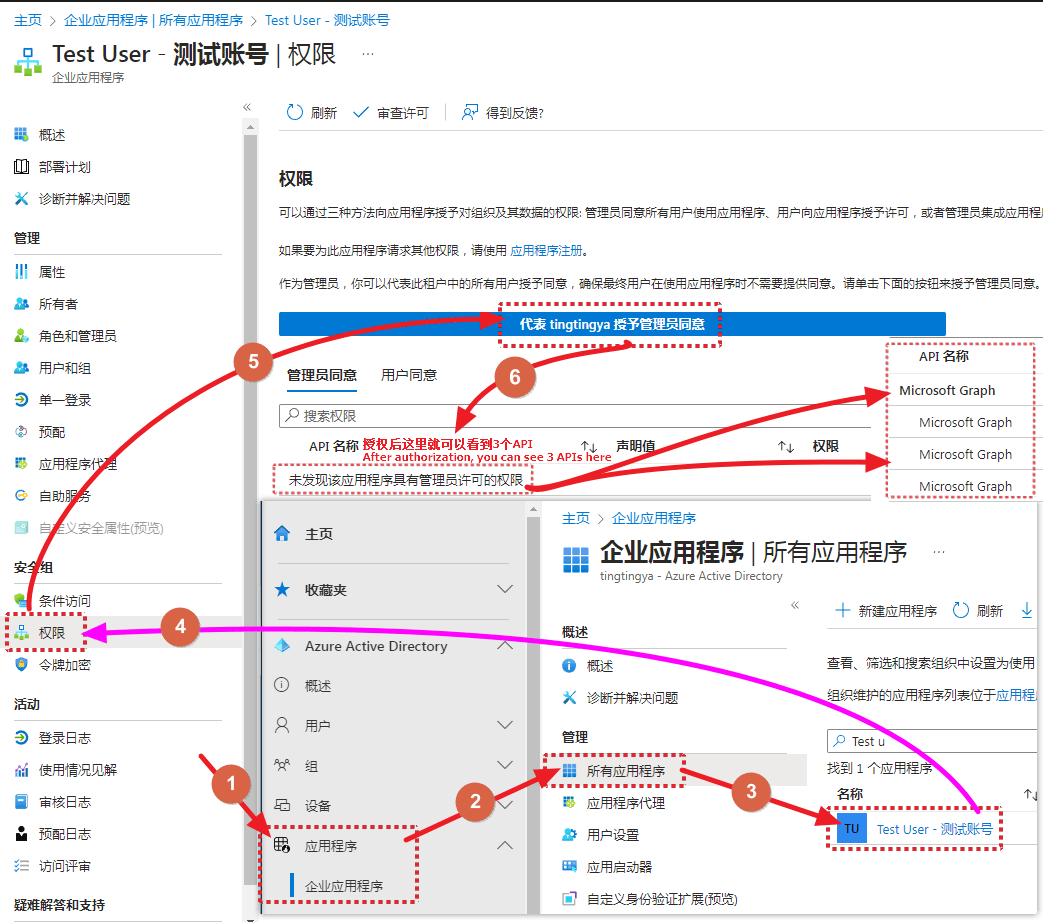
matters needing attention
- If you start to register the application, the callback parameters are not the same, you may get an error when you click Authorization, remember to write the same
- How to check whether the authorization is successful. If it is not authorized, the page will prompt
The application has not been found to have the authorization of the administrator's permission. After the authorization is successful, refresh the page and you will see three API permissions, as shown in the figure below- The above is what it looks like when it is not authorized, and the following is what it looks like after authorization (just refresh the page after authorization)
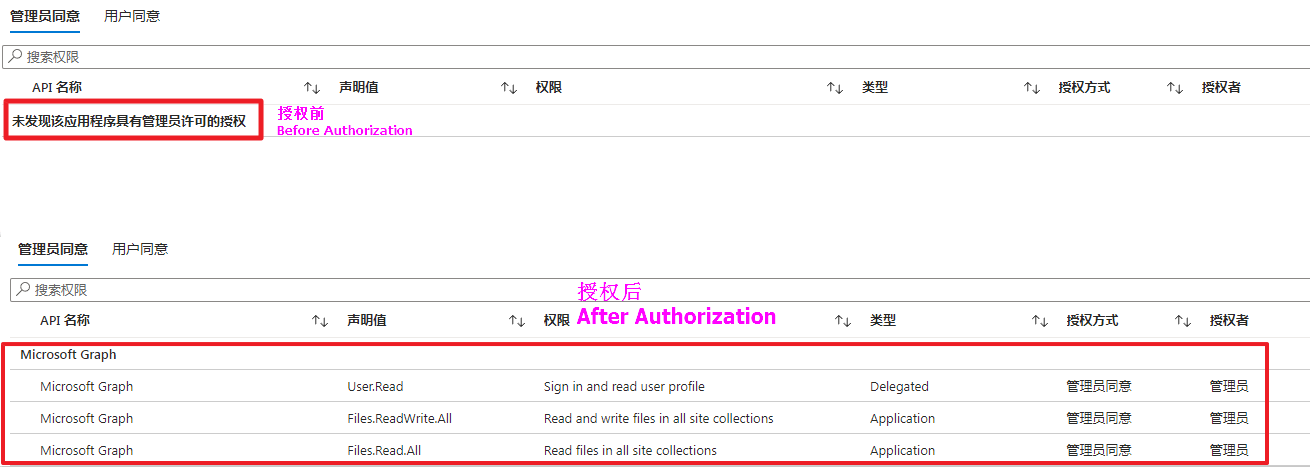
- The above is what it looks like when it is not authorized, and the following is what it looks like after authorization (just refresh the page after authorization)
From the beginning to the present, we have obtained the following parameters: tenant ID1, registered application2, client ID/secret key3, authorization API/administrator API4 Then open the browser and finally authorize it through the following format, which are tenant ID client ID Callback URL Change to your own final login to receive
https://login.microsoftonline.com/{tenant ID or common}/adminConsent?client_id={client
ID}&redirect_uri={Callback URL}
For OneDrive (Operated by 21Vianet), please use:
https://login.partner.microsoftonline.cn/{tenant ID or common}/adminConsent?client_id={client
ID}&redirect_uri={Callback URL}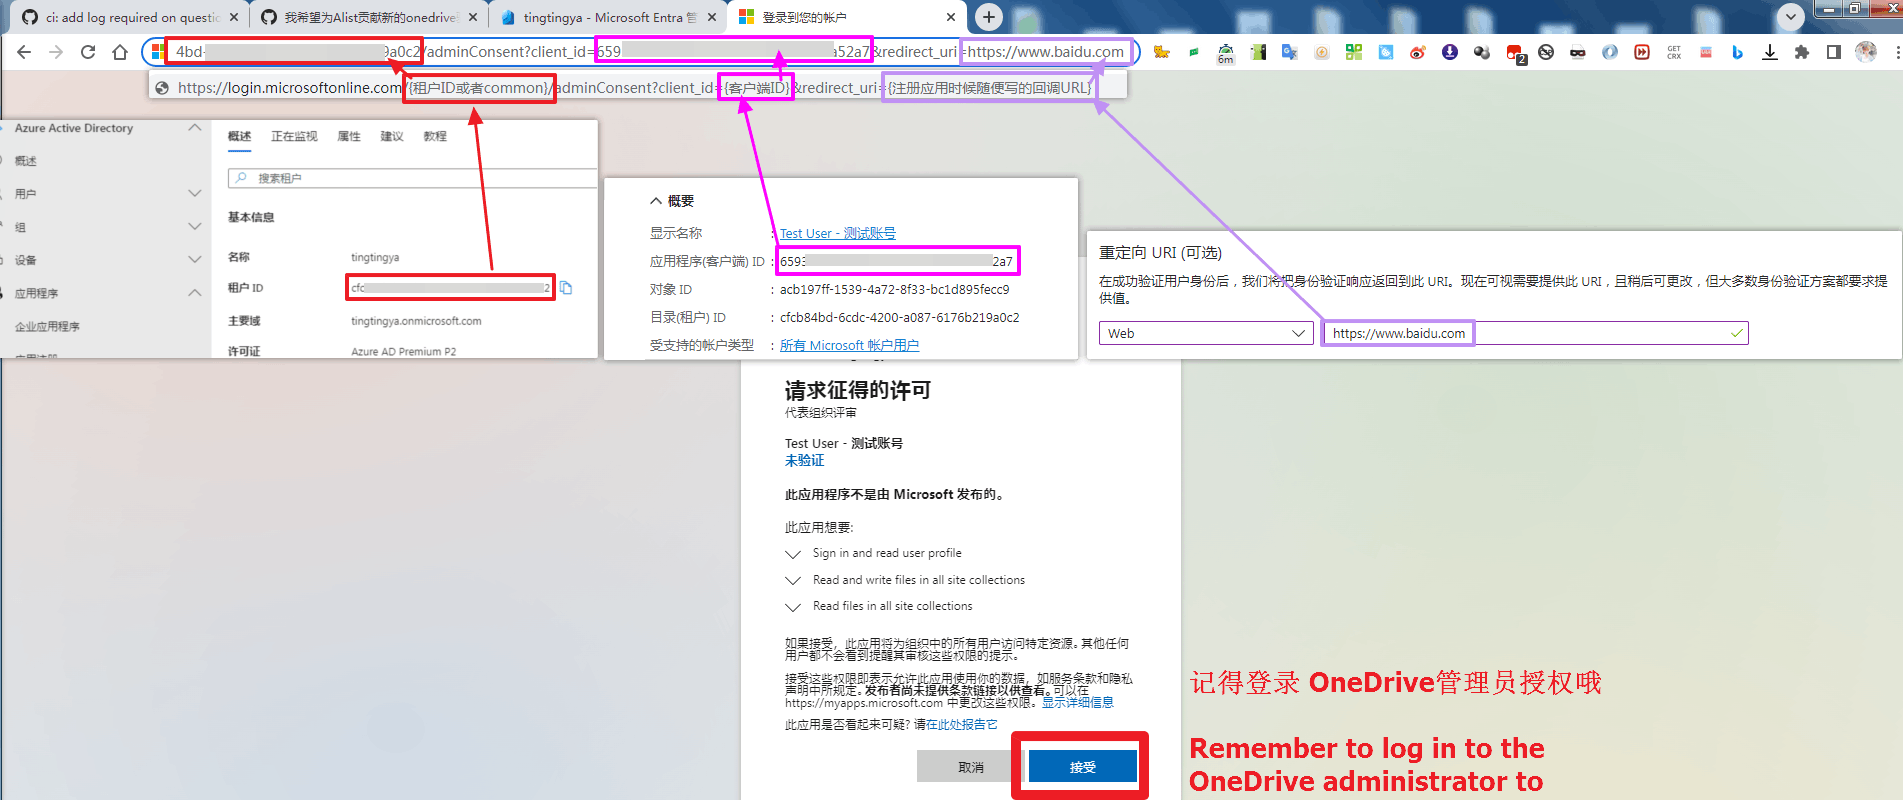 If you log in according to the spelled link and find that you are redirected to a blank page, such as the sample code and picture below, the authorization is successful, don’t worry
https://entra.microsoft.com/TokenAuthorize?admin_consent=True&tenant={Tenant ID}#
- 注册一个应用,类型自己选,建议选第三吧
- 重定向URL(回调参数),类型选择Web,参数填写: https://entra.microsoft.com/TokenAuthorize ,否则后面授权时无法授权。世纪互联版本的 OneDrive 请填写: https://entra.microsoftonline.cn/TokenAuthorize
- 填好后点击下方的注册 跳转后就可以看到
客户端ID
我们去获取一个客户端秘钥,按照下图获取即可,记得 客户端秘钥 要及时保存,只会出现一次
客户端秘钥拿到了,去授权一下使用的 API,依旧跟着下图获取即可
API授权后,我们去授权组织应用
- 左侧侧边栏 —> 企业应用程序 —> 所有应用程序 —> {选择我们开始新建的那个应用名称} —> 权限 —> 点击 代表
xxxx授予管理员同意
注意事项
- 如果你在开始注册应用时,回调参数不是一样的可能点击授权时会报错,记得写一样的
- 如何查看是否授权成功,未授权时页面是提示
未发现该应用程序具有管理员许可的授权,授权成功后刷新一下页面会看到三条API权限如下图所示- 上面是未授权时的样子,下面是授权后的样子(授权后刷新页面即可)
- 上面是未授权时的样子,下面是授权后的样子(授权后刷新页面即可)
通过开始到现在 我们分别拿到了如下参数:租户ID1,注册应用2,拿到客户端ID/秘钥3,授权API/管理员API4
然后通过下面的格式最终授权一下即可,分别是租户ID、客户端ID、回调参数URL改成自己的最终登录收取即可
https://login.microsoftonline.com/{租户ID或者common}/adminConsent?client_id={客户端ID}&redirect_uri={注册应用时的回调URL}世纪互联版本的 OneDrive 请采用这个格式
https://login.partner.microsoftonline.cn/{租户ID或者common}/adminConsent?client_id={客户端ID}&redirect_uri={注册应用时的回调URL} 如果你按照拼写好后的链接也登录了发现跳转到了一个空白页面,例如下面示例代码和图片中的就是授权成功了不用担心
https://entra.microsoft.com/TokenAuthorize?admin_consent=True&tenant={租户ID}#Fill in the example
填写示例
Fill in the values obtained in the above process one by one. If you don’t know which email address it is, you can find it by view all users of the organization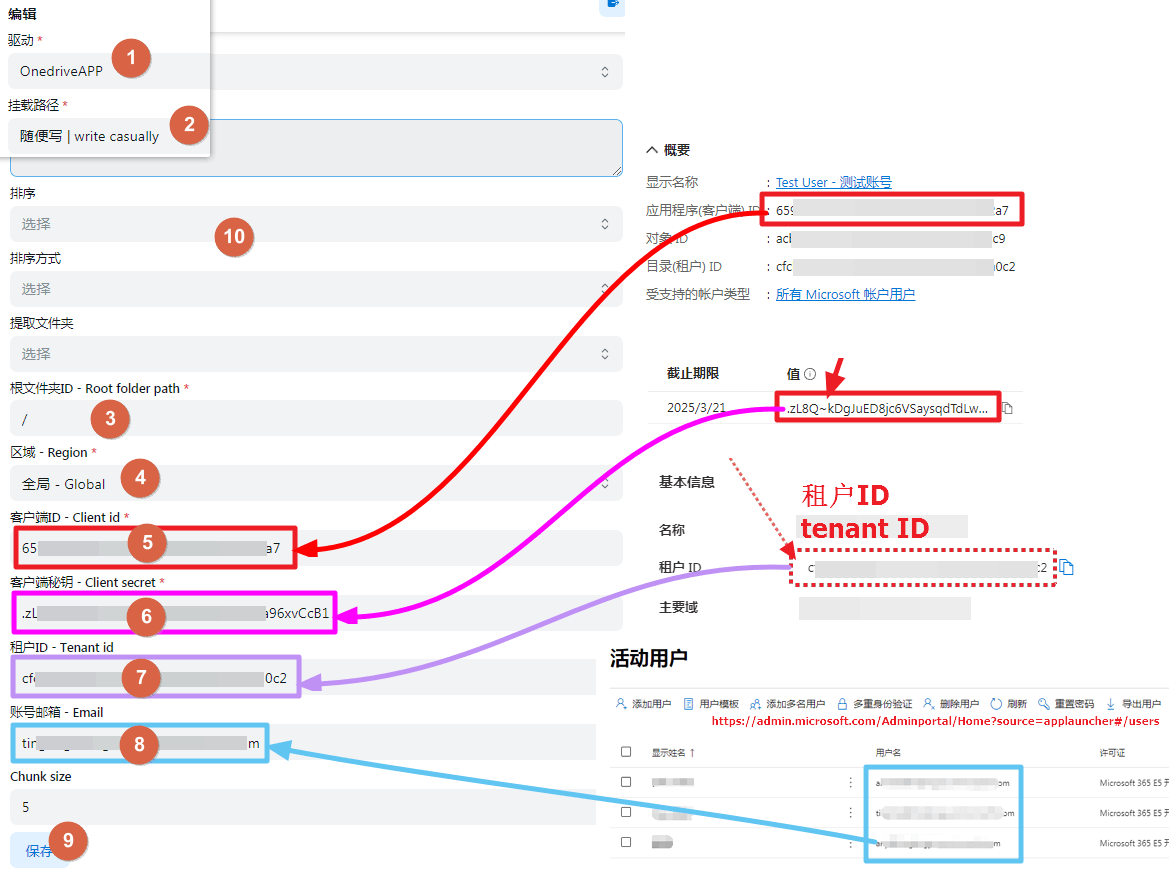
将上述过程中获取得到的值依次填入即可,如果那个邮箱你不知道是什么了,可以通过查看组织所有用户来查找
View all users of the organization
查看组织所有用户
If you don’t know how many users there are in your OneDrive organization, you can go to the link below to log in to the admin account to view https://admin.microsoft.com/Adminportal/Home?source=applauncher#/users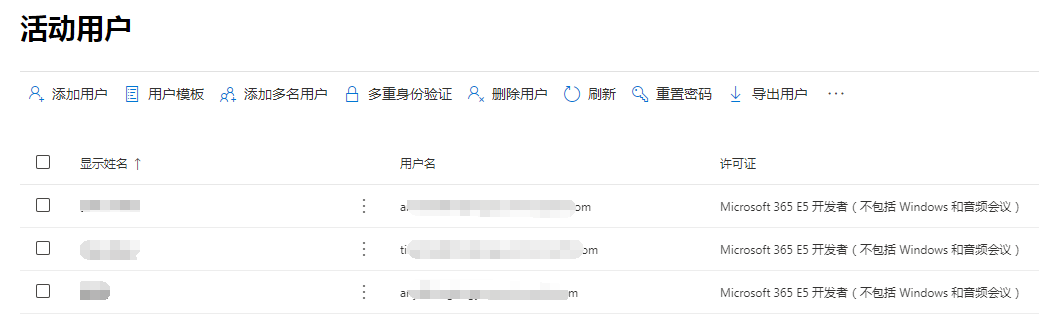
如果不知道自己的OneDrive组织有多少用户可以前往下面的链接登录 admin账号查看 https://admin.microsoft.com/Adminportal/Home?source=applauncher#/users
Error message
错误提示
- Tips:Either scp or roles claim need to be present in the token Error because you didn’t do it in step 4
grant xxx administrator consentcaused by,Pay attention to the tips below the fourth step - Tips:failed get objs: failed to list objs: Unable to retrieve user’s mysite URL Error The newly created
OneDriveuser account does not take effect in real time, Delay takes effect, wait for a few hours and try again Case
- 提示:Either scp or roles claim need to be present in the token 错误 是因为你没有在第 4 步的时候进行
代表xxxx授予管理员同意导致的,注意查看第四步下面的提示 - 提示:failed get objs: failed to list objs: Unable to retrieve user’s mysite URL 错误 新建的
OneDrive用户账号不是实时生效,会延时生效等待几小时后试试看 案例
Add OneDrive_App accounts in batches
批量添加OneDrive_App账号
software used:https://github.com/yzbtdiy/alist_batch
Fill in the parameters. If you don’t understand, you can watch the video below.
Do not leave blank lines in the two configuration files, as this will also report an error config.yaml
url: ALIST_URL
auth:
  username: USERNAME
  password: PASSWORD
token: ALIST_TOKEN
aliyun:
  enable: false
  refresh_token: ALI_YUNPAN_REFRESH_TOKEN
pikpak:
  enable: false
  username: PIKPAK_EMAIL
  password: PIKPAK_PASSWORD
onedrive_app:
  enable: true
  region: global
  tenants:
    - id: 1
      client_id: client_id
      client_secret: client_secret
      tenant_id: tenant_id
onedrive_app.yaml
Category:
  mount: 1:user1@xxx.onmicrosoft.com
  mount2: 1:user2@xxx.onmicrosoft.com:/folder1
  mount3: 1:user2@xxx.onmicrosoft.com:/folder2
Category2:
  mount11: 1:user1@xxx.onmicrosoft.com
  mount22: 1:user2@xxx.onmicrosoft.com:/folder1
mount33: 1:user2@xxx.onmicrosoft.com:/folder2使用的软件:https://github.com/yzbtdiy/alist_batch
参数填写,看不懂可以看下方的视频
两个配置文件不要留空白空行哦,那样也会报错的 config.yaml
url: ALIST_URL
auth:
  username: USERNAME
  password: PASSWORD
token: ALIST_TOKEN
aliyun:
  enable: false
  refresh_token: ALI_YUNPAN_REFRESH_TOKEN
pikpak:
  enable: false
  username: PIKPAK_EMAIL
  password: PIKPAK_PASSWORD
onedrive_app:
  enable: true
  # global是全局例如E5 A1 A1P, 世纪互联是cn 德国版是de 美国版是us
  region: global
  tenants:
    - id: 1
      client_id: 客户端ID
      client_secret: 客户端秘钥
      tenant_id: 租户ID
onedrive_app.yaml
分类1:
  挂载1: 1:user1@xxx.onmicrosoft.com
  挂载2: 1:user2@xxx.onmicrosoft.com:/folder1
  挂载3: 1:user2@xxx.onmicrosoft.com:/folder2
分类2:
  挂载11: 1:user1@xxx.onmicrosoft.com
  挂载22: 1:user2@xxx.onmicrosoft.com:/folder1
  挂载33: 1:user2@xxx.onmicrosoft.com:/folder2