Third-party single sign-on
1. Single sign-on client id
1. 单点登录客户端ID
client ID.
客户端ID。
2. Single sign-on client secrets
2. 单点登录客户端秘钥
client secrets.
matters needing attention
- Remember to write and save the background parameters of OpenList. After writing and saving, you have to go back to the bottom of the personal data and there will be a button that needs to be bound, otherwise it cannot be used
- Only one of the four types of single sign-on can be enabled temporarily. If you used other single sign-on methods before and then changed to a new single Unbind (just one click) and then bind the single sign-on method you want to use now.
- If you use
GitHub,Microsoft,Google,DingTalk, you only need to fill in the client ID and secret key, and select the corresponding platform in the options.- If you use
Casdoorthe following parameters need to be filled in, just follow the tutorial to fill in
- If you use
客户端秘钥
注意事项
OpenList 后台参数也记得写好保存,写好保存后也要回到个人资料下方会有一个需要绑定的按钮进行绑定,否则无法使用
四种单点登录暂时只能启用一种,如果你之前用的是别的单点登录方式然后换了新的单点登录方式 那么你回到个人资料绑定的时候需要先将之前的解绑(点击一下即可)然后再绑定现在你要使用的单点登录方式。
如果使用
GitHub,微软,谷歌,钉钉,只需要填写客户端ID和秘钥,选项中选择对应的平台即可- 如果使用
Casdoor以下的参数都需要填写,照着教程填写即可
- 如果使用
3. Registration binding single sign-on
3. 注册绑定单点登录
3.1. Github
WARNING
If you want to use GitHub to log in, you first need the machine you built OpenList to be able to connect to GitHub before you can call and use it, otherwise you cannot use it if the link is not connected
Open https://github.com/settings/developers Click New OAuth App
3.1. GitHub
WARNING
若想使用GitHub登录,首选需要你搭建OpenList的机器能连接访问GitHub才可以调用使用,不然连接不上无法使用
打开 https://github.com/settings/developers 点击 New OAuth App
3.1.1. Register OAuth Instructions
3.1.1. Register OAuth 填写说明
- Application name
- Write whatever you want to call it
- Homepage URL
- home URL address
- Both http and https can be used
- home URL address
- Application description
- write whatever you want
- Authorization callback URL
- Callback URL address
- https://your_domain/api/auth/sso_callback - Both http and https can be used Remember to get Client secrets after filling it out, and then fill it in the OpenList background. Remember to write and save the background parameters of OpenList. After writing and saving, you have to go back to the bottom of the personal data and there will be a button that needs to be bound, otherwise it cannot be used
- Application name
- 随便写想叫什么叫什么
- Homepage URL
- 主页网址地址
- 可以使用http https都可以
- 主页网址地址
- Application description
- 随便写
- Authorization callback URL
- 回调URL地址
- https://你的域名/api/auth/sso_callback - 可以使用http https都可以 填写完毕后记得获取一下 Client secrets,然后填写到OpenList后台。
3.1.2. Completely fill in the reference schematic
3.1.2. 完整填写参考示意图


3.1.3. GitHub login Video Tutorials
3.1.3. GitHub视频教程
3.2.Dingtalk
3.2.钉钉
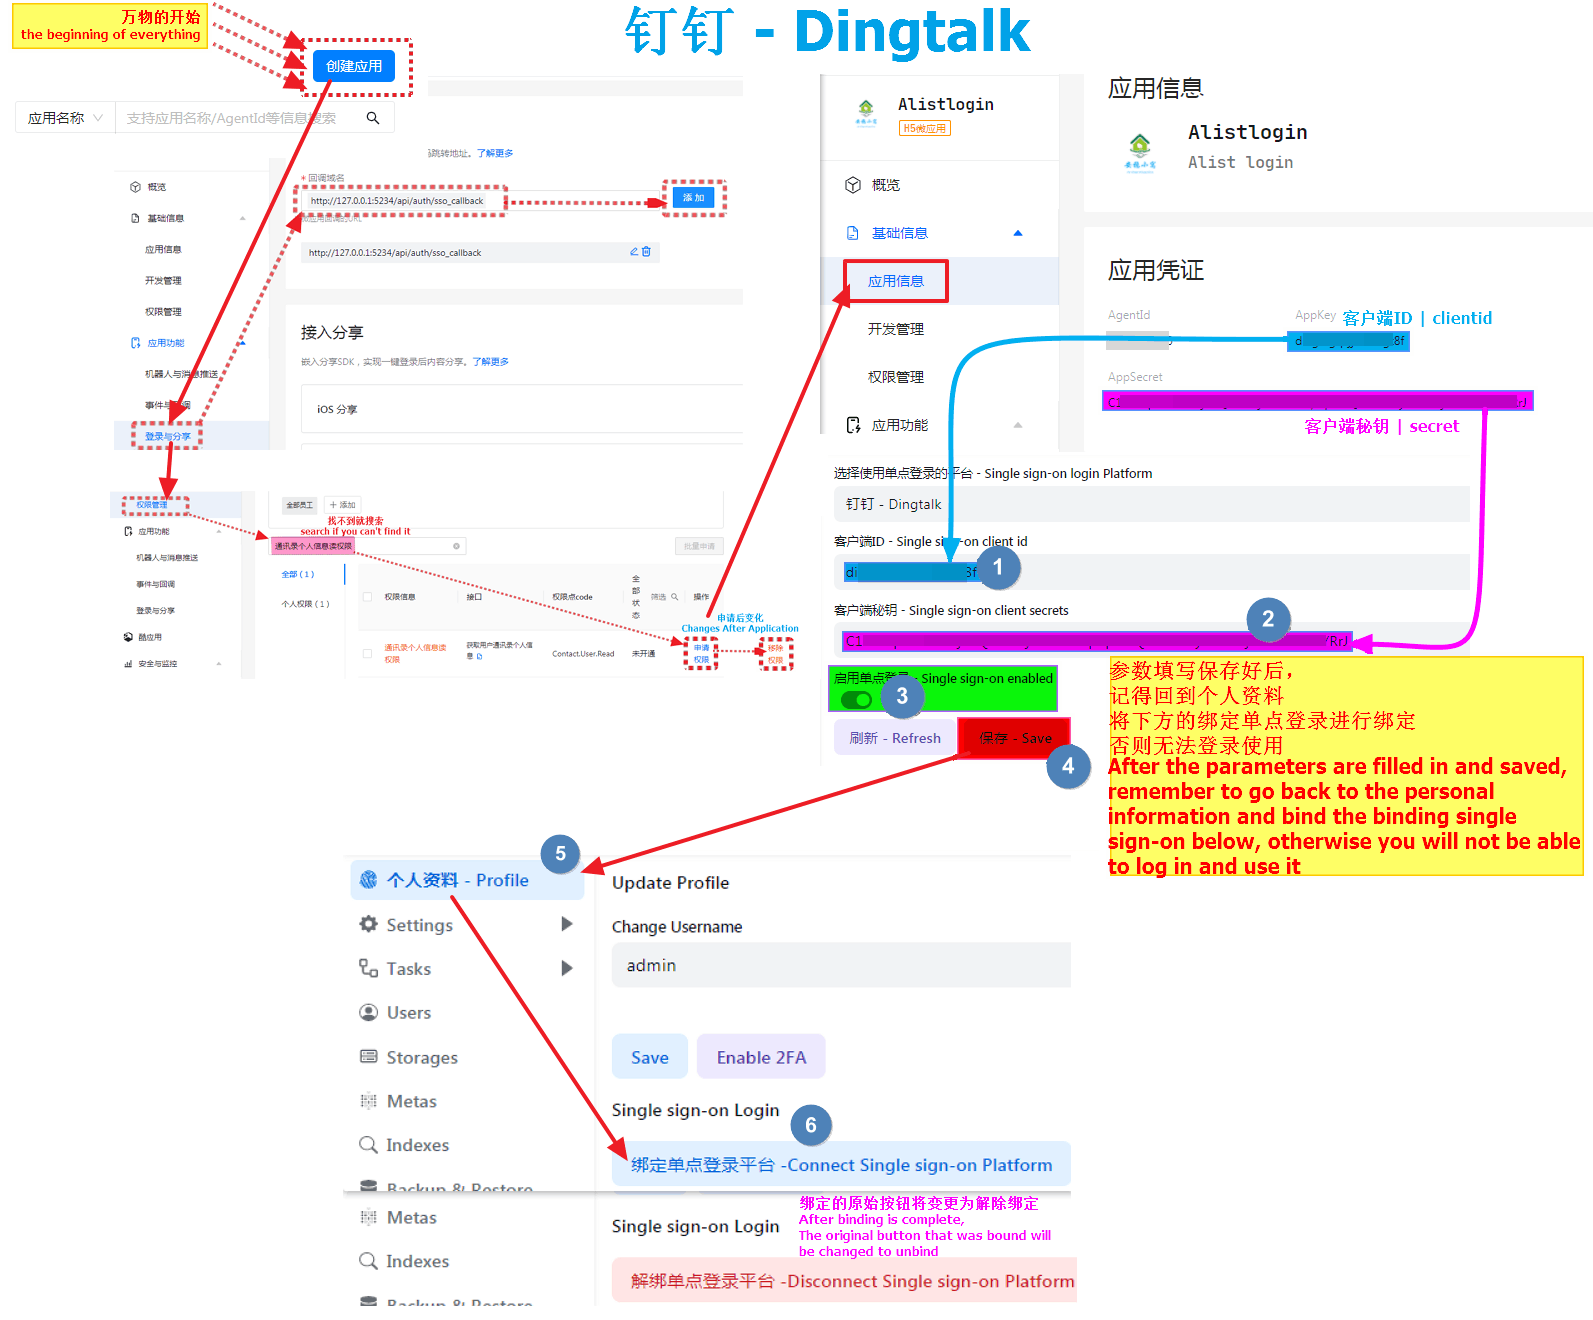
First open https://open-dev.dingtalk.com/fe/app#/corp/app
In the upper right corner, first select New Application, select H5 Micro Application as the type, fill in the content by yourself and click Confirm to create
Click on the new application and we will see the application credentials option, where AppKey is the client ID, and AppSecret is the client secret key
- Just fill in the corresponding parameters in the OpenList background single sign-on Go to the left column and find
Login and Share**Fill in the callback parametershttp://127.0.0.1:5234/api/auth/sso_callback
http://127.0.0.1:5244/api/auth/sso_callbackNote: I used the callback parameter here for local testing. http://127.x When you use it, Write http(s)://your own domain name/api/auth/sso_callback when filling in and using it by yourself
Write the callback parameters well. Let’s go to the left column and find
Privilege Management, findPersonal Information Read Permission of Address Bookand click to authorizeRemember to write and save the background parameters of OpenList. After writing and saving, you have to go back to the bottom of the personal data and there will be a button that needs to be bound, otherwise it cannot be used
首先打开 https://open-dev.dingtalk.com/fe/app#/corp/app
右上角先 新建应用,类型选择 H5微应用 ,内容自己填写点击确认创建
点击新建好好的应用我们就会看到应用凭证选项,里面的 AppKey 就是客户端ID,AppSecret 是客户端秘钥
填写到OpenList后台单点登录内对应的参数即可
来到左侧栏找到
登录与分享**填写回调参数 **http://127.0.0.1:5234/api/auth/sso_callback****
http://127.0.0.1:5244/api/auth/sso_callback注:我这里回调参数是本地测试就使用了 http://127.x 大家使用的时候写 http(s)://自己域名/api/auth/sso_callback
回调参数写好好我们来到左侧栏找到
权限管理找到通讯录个人信息读权限然后点击进行授权OpenList 后台参数也记得写好保存,写好保存后也要回到个人资料下方会有一个需要绑定的按钮进行绑定,否则无法使用
3.2.1. Completely fill in the reference schematic
3.2.1. 完整填写参考示意图

3.3. Microsoft
3.3. 微软
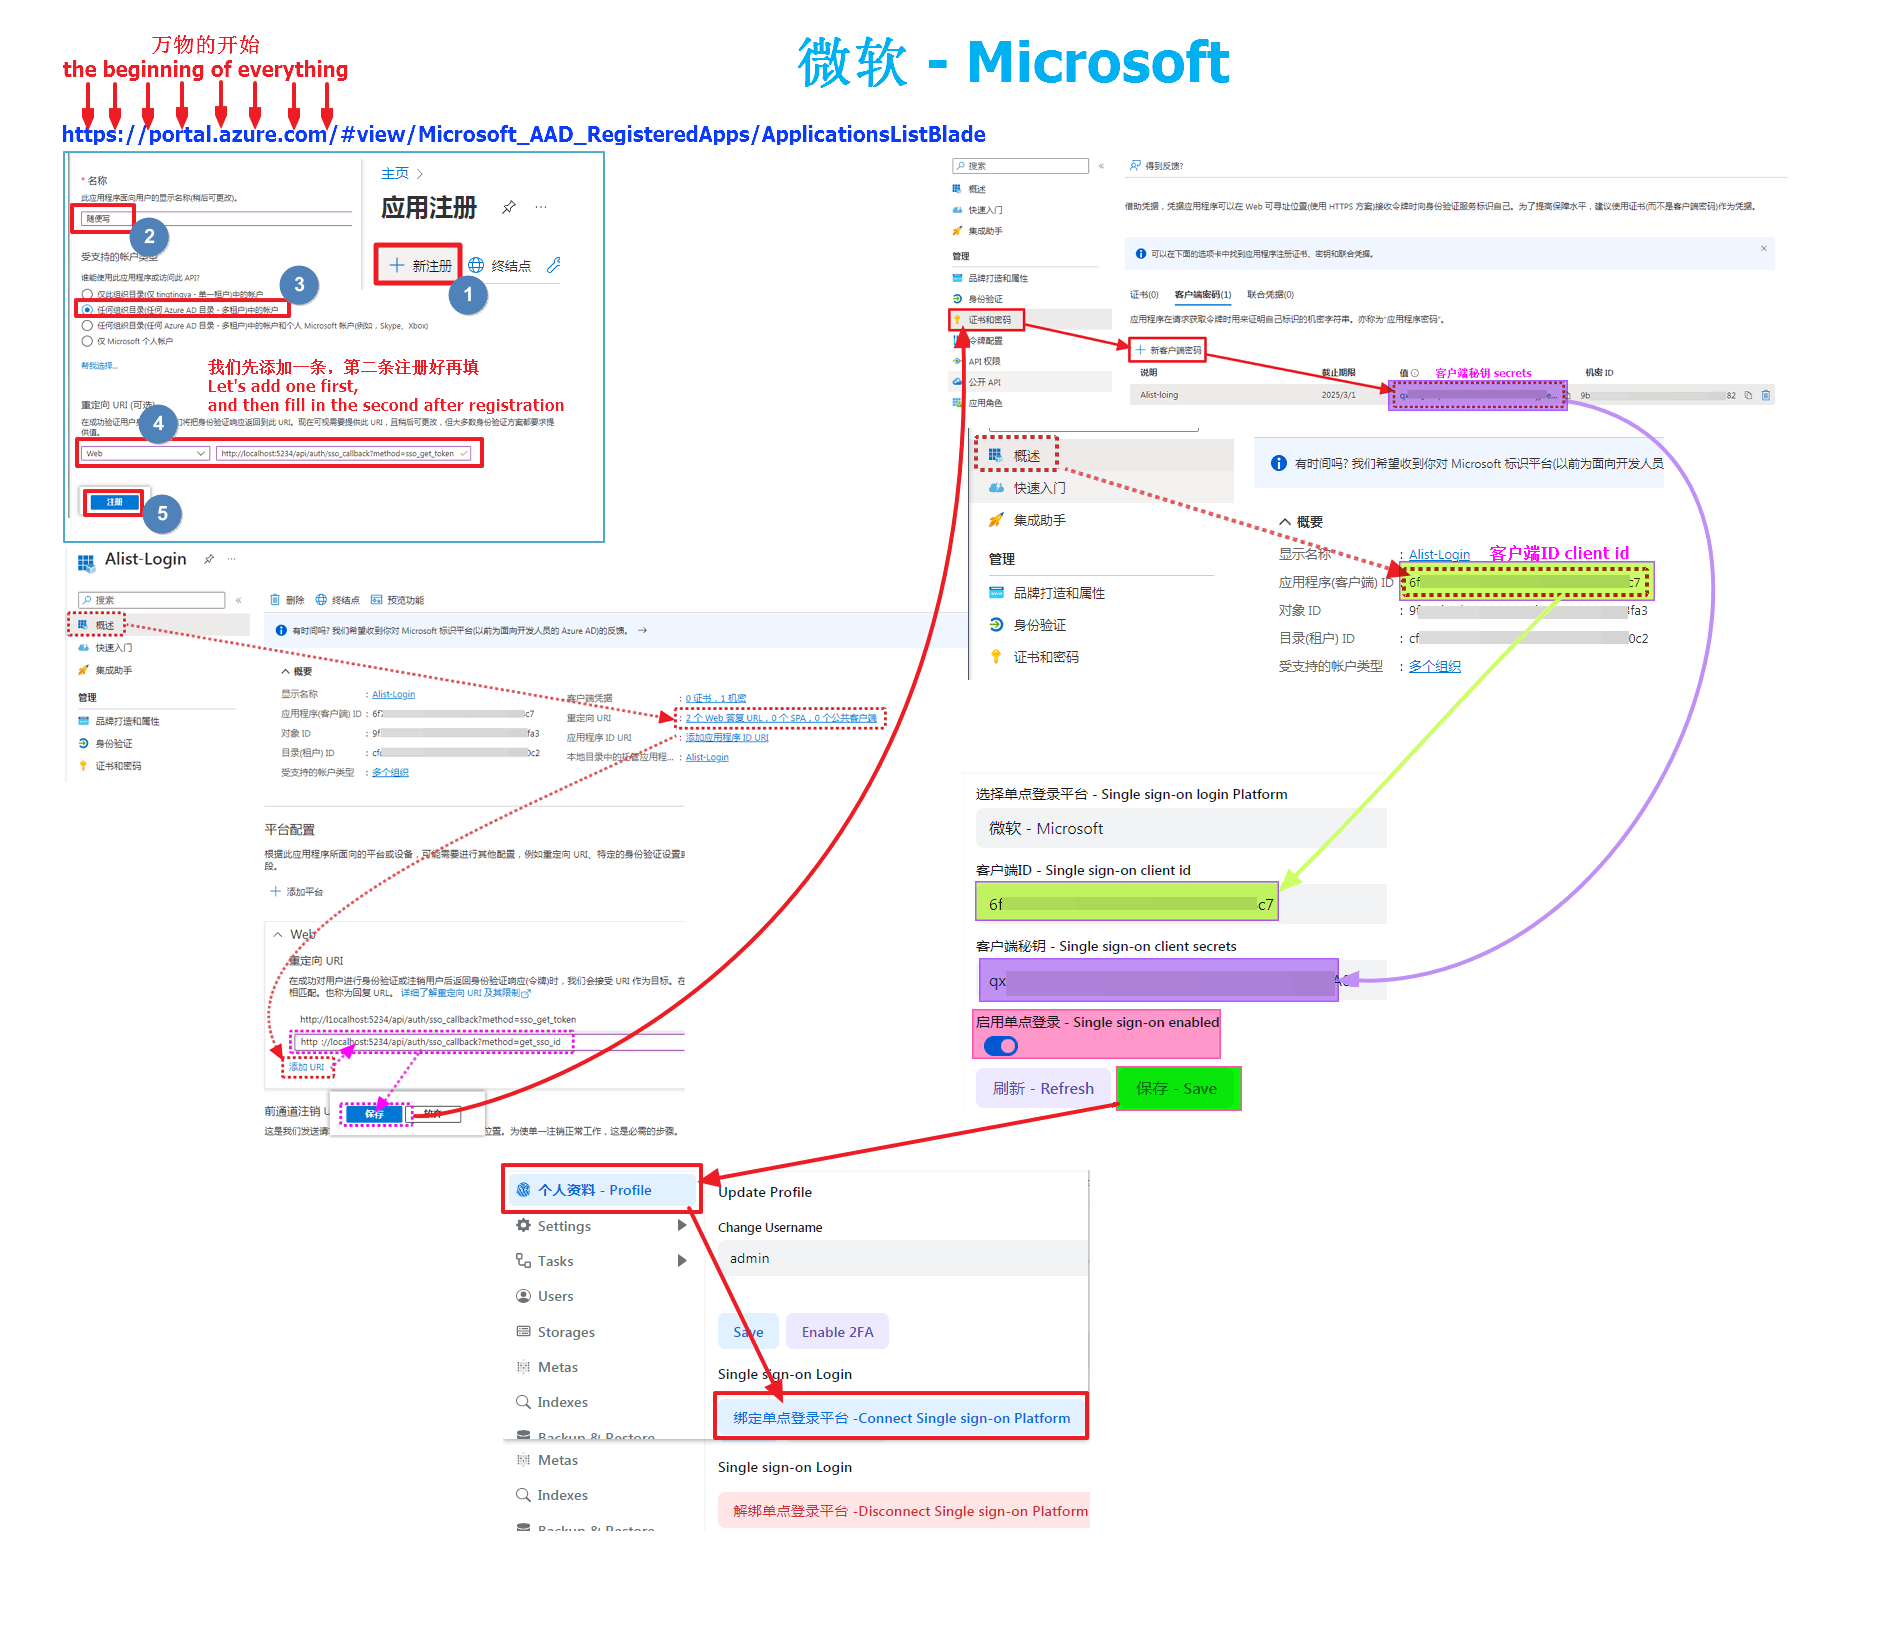
First open https://portal.azure.com/#view/Microsoft_AAD_RegisteredApps/ApplicationsListBlade
Then register to create an application, I won’t say much here, you can see the complete schematic diagram
Account type must be selected: Account in any organizational directory (any Azure AD directory - multi-tenant)
Microsoft callback parameters: must start with "HTTPS" or "http://localhost (I used localhost here for local testing)
http://localhost:5244/api/auth/sso_callback?method=sso_get_token
http://localhost:5244/api/auth/sso_callback?method=get_sso_id
Write http(s)://your own domain name/api/auth/sso_callback?method=sso_get_token when filling in and using it by yourself
Write http(s)://your own domain name/api/auth/sso_callback?method=get_sso_id when filling in and using it by yourself
Note: When adding a redirect URL to a new application, only one can be added. After the application is registered and registered, click on the application to see the options behind the redirect URI
After filling it out, we click
Certificate and Passwordon the left column to create a newClient Passwordto get our client secret keyAfter the client password is created, the
valueparameter is ourclient key, remember to save it, it will not appear again if it appears once, if you don’t save it in time, just create a new client passwordThe client ID is in
Overviewat the top of the left column, find the application (client) ID, which is the client ID we need to fill in the OpenListWe have got the client ID and secret key and fill them in the OpenList single sign-on configuration. Remember to write and save the background parameters of OpenList. After writing and saving, you have to go back to the bottom of the personal data and there will be a button that needs to be bound, otherwise it cannot be used
首先打开 https://portal.azure.com/#view/Microsoft_AAD_RegisteredApps/ApplicationsListBlade 然后注册创建应用,我这里就不多说了可以看完整示意图 账户类型必须选择:任何组织目录(任何 Azure AD 目录 - 多租户)中的帐户 微软回调参数:必须以"HTTPS"或"http://localhost开头 (我这里是本地测试就用了localhost)
http://localhost:5244/api/auth/sso_callback?method=sso_get_token
http://localhost:5244/api/auth/sso_callback?method=get_sso_id
大家使用的时候写 http(s)://自己域名/api/auth/sso_callback?method=sso_get_token
大家使用的时候写 http(s)://自己域名/api/auth/sso_callback?method=get_sso_id
注:在新建应用时添加重定向URL的时候只能添加一条,第二条等应用好注册好后点击应用看到 重定向 URI 后面的选项
填写好后我们点击左侧栏的
证书和密码新建一个客户端密码即可获得我们的客户端秘钥客户端密码创建好后
值参数是我们的客户端秘钥,记得保存,出现一次就不会在出现了,如果没有及时保存新建一个客户端密码即可客户端ID在左侧栏顶部的
概述,找到 应用程序(客户端)ID 就是我们需要填写到OpenList里面的客户端ID客户端ID和秘钥我们都拿到了填写到OpenList单点登录配置里面去即可
OpenList 后台参数也记得写好保存,写好保存后也要回到个人资料下方会有一个需要绑定的按钮进行绑定,否则无法使用
3.3.1. Completely fill in the reference schematic
3.3.1. 完整填写参考示意图

3.4. Google
3.4. 谷歌
WARNING
If you want to use Google to log in, you first need the machine you built OpenList to be able to connect to Google before you can call and use it, otherwise you cannot use it if the link is not connected
- First open https://console.cloud.google.com/projectselector2/apis/dashboard?hl=zh-cn
- If you are using it for the first time, you need to create a new project first (just write whatever you want, skip it if it has already been created)
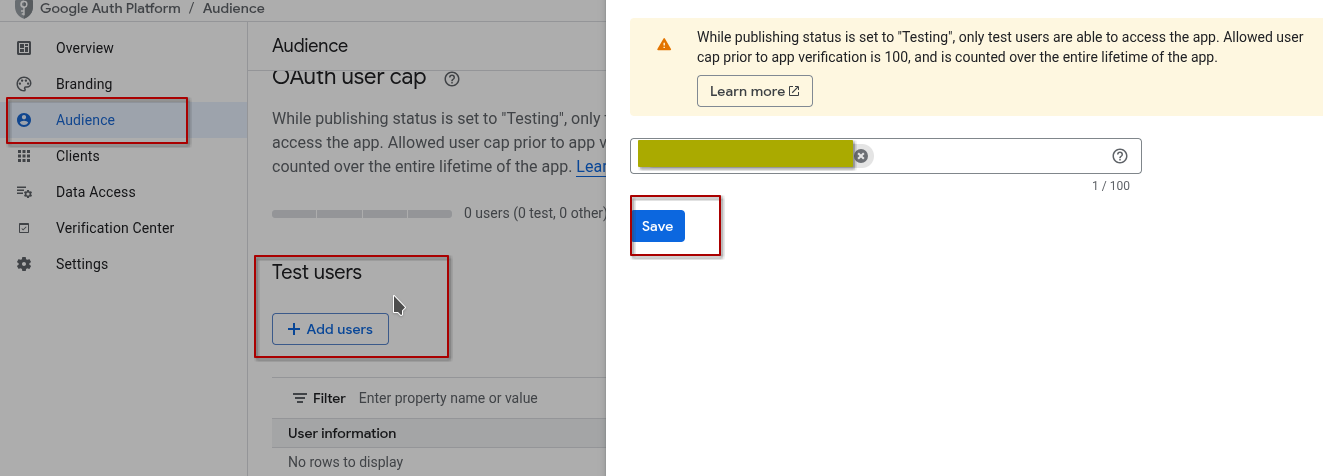
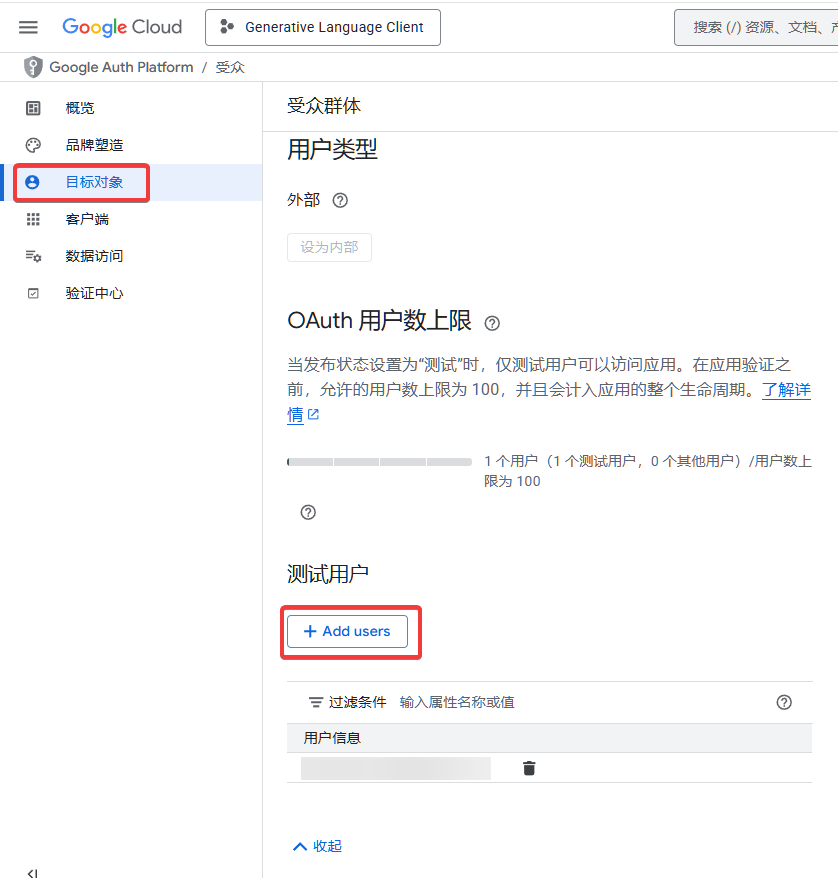
- Then configure the consent screen (there is a separate instruction on how to configure the document, if it is already configured, skip it)
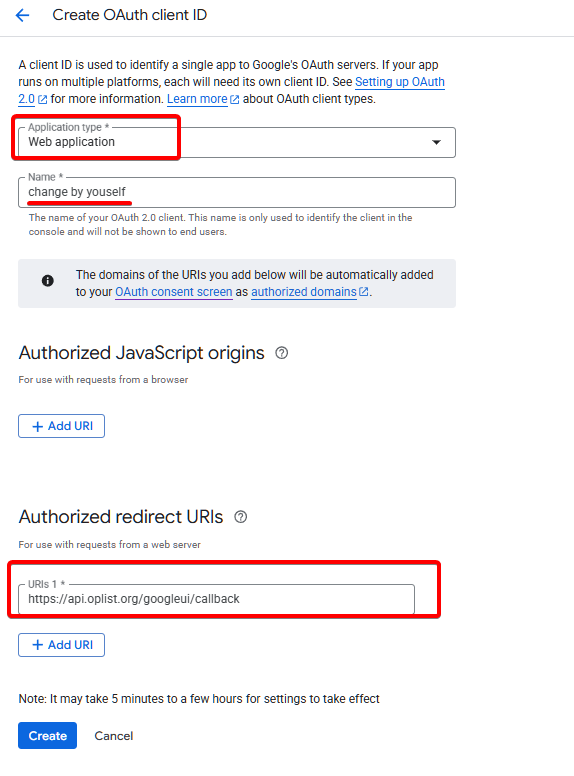
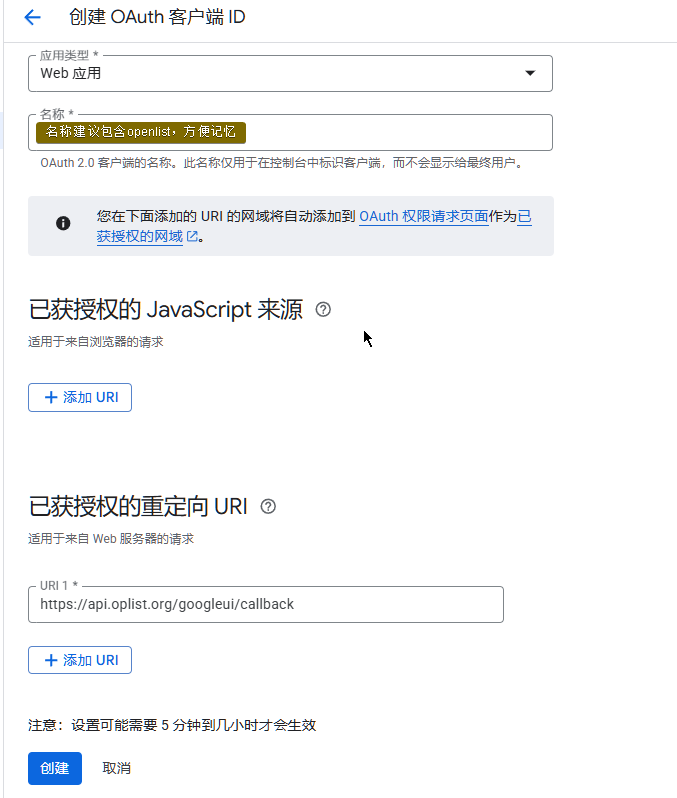
- After configuring the unified screen, we click the credentials on the left, create credentials, and select OAuth client ID
- Application Type Select Web Application, and write the name as you like
- Then add our two callback parameters in the authorized redirect URI
http://127.0.0.1:5244/api/auth/sso_callback?method=get_sso_id
http://127.0.0.1:5244/api/auth/sso_callback?method=sso_get_token- Write http(s)://your own domain name/api/auth/sso_callback?method=get_sso_id when filling in and using it by yourself
- Write http(s)://your own domain name/api/auth/sso_callback?method=sso_get_token when filling in and using it by yourself After filling it out, click Create to get the OAuth client ID and secret key
- (It doesn’t matter if you accidentally close it here, just click on the name of the application we created and enter it in the upper right position to see it) We have got the client ID and secret key and fill them in the OpenList single sign-on configuration. Remember to write and save the background parameters of OpenList. After writing and saving, you have to go back to the bottom of the personal data and there will be a button that needs to be bound, otherwise it cannot be used
WARNING
若想使用Google登录,首选需要你搭建OpenList的机器能连接访问Google才可以调用使用,不然连接不上无法使用
- 首先打开 https://console.cloud.google.com/projectselector2/apis/dashboard?hl=zh-cn
- 如果是第一次使用需要先新建一个项目(随便写就行,如果已创建跳过)
- 然后配置同意屏幕(如何配置文档中有单独说明,如果已经配置好跳过)
- 配置好统一屏幕后我们点左侧的凭据,创建凭据,选择OAuth 客户端ID
- 应用类型 选择 Web 应用,名称随便写
- 然后在 已获授权的重定向 URI 添加我们的两个回调参数
http://127.0.0.1:5244/api/auth/sso_callback?method=get_sso_id
http://127.0.0.1:5244/api/auth/sso_callback?method=sso_get_token- 大家使用的时候写 http(s)://自己域名/api/auth/sso_callback?method=get_sso_id
- 大家使用的时候写 http(s)://自己域名/api/auth/sso_callback?method=sso_get_token 填写好后,点击创建就能拿到 OAuth的客户端ID和秘钥
- (在这里如果你不小心关闭了也没关系,点击我们创建的应用名称进去在右上的位置就能看到) 客户端ID和秘钥我们都拿到了填写到OpenList单点登录配置里面去即可 OpenList 后台参数也记得写好保存,写好保存后也要回到个人资料下方会有一个需要绑定的按钮进行绑定,否则无法使用
3.4.1. Agree to screen configuration
3.4.1. 同意屏幕配置
If it has been configured, just ignore this picture (you can zoom in if you can’t see it clearly) 
如已配置好 忽略本图即可(如果看不清楚可以放大) 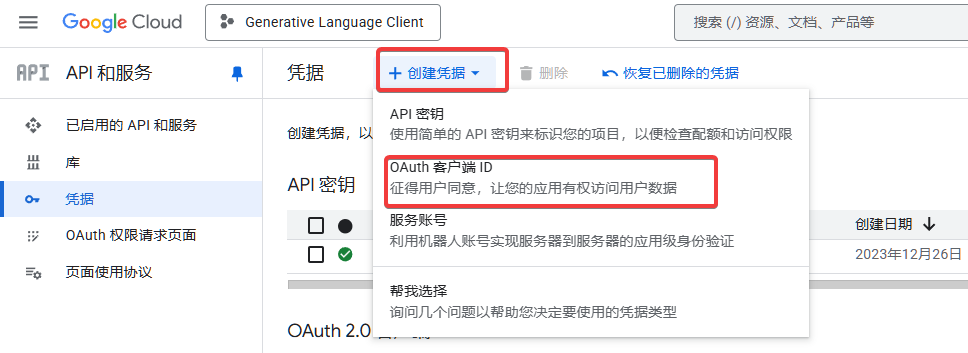
3.4.2. Completely fill in the reference schematic
3.4.2. 完整填写参考示意图


3.5. Casdoor
3.5. Casdoor
What is Casdoor? Yes, you can use other OAuth applications to log in. Self-deployment is open source and free, and official hosting requires payment.
Now, Casdoor supports many OAuth application providers, as many as dozens of kinds, you have seen and not seen
GitHub open source link: https://github.com/casdoor/casdoor
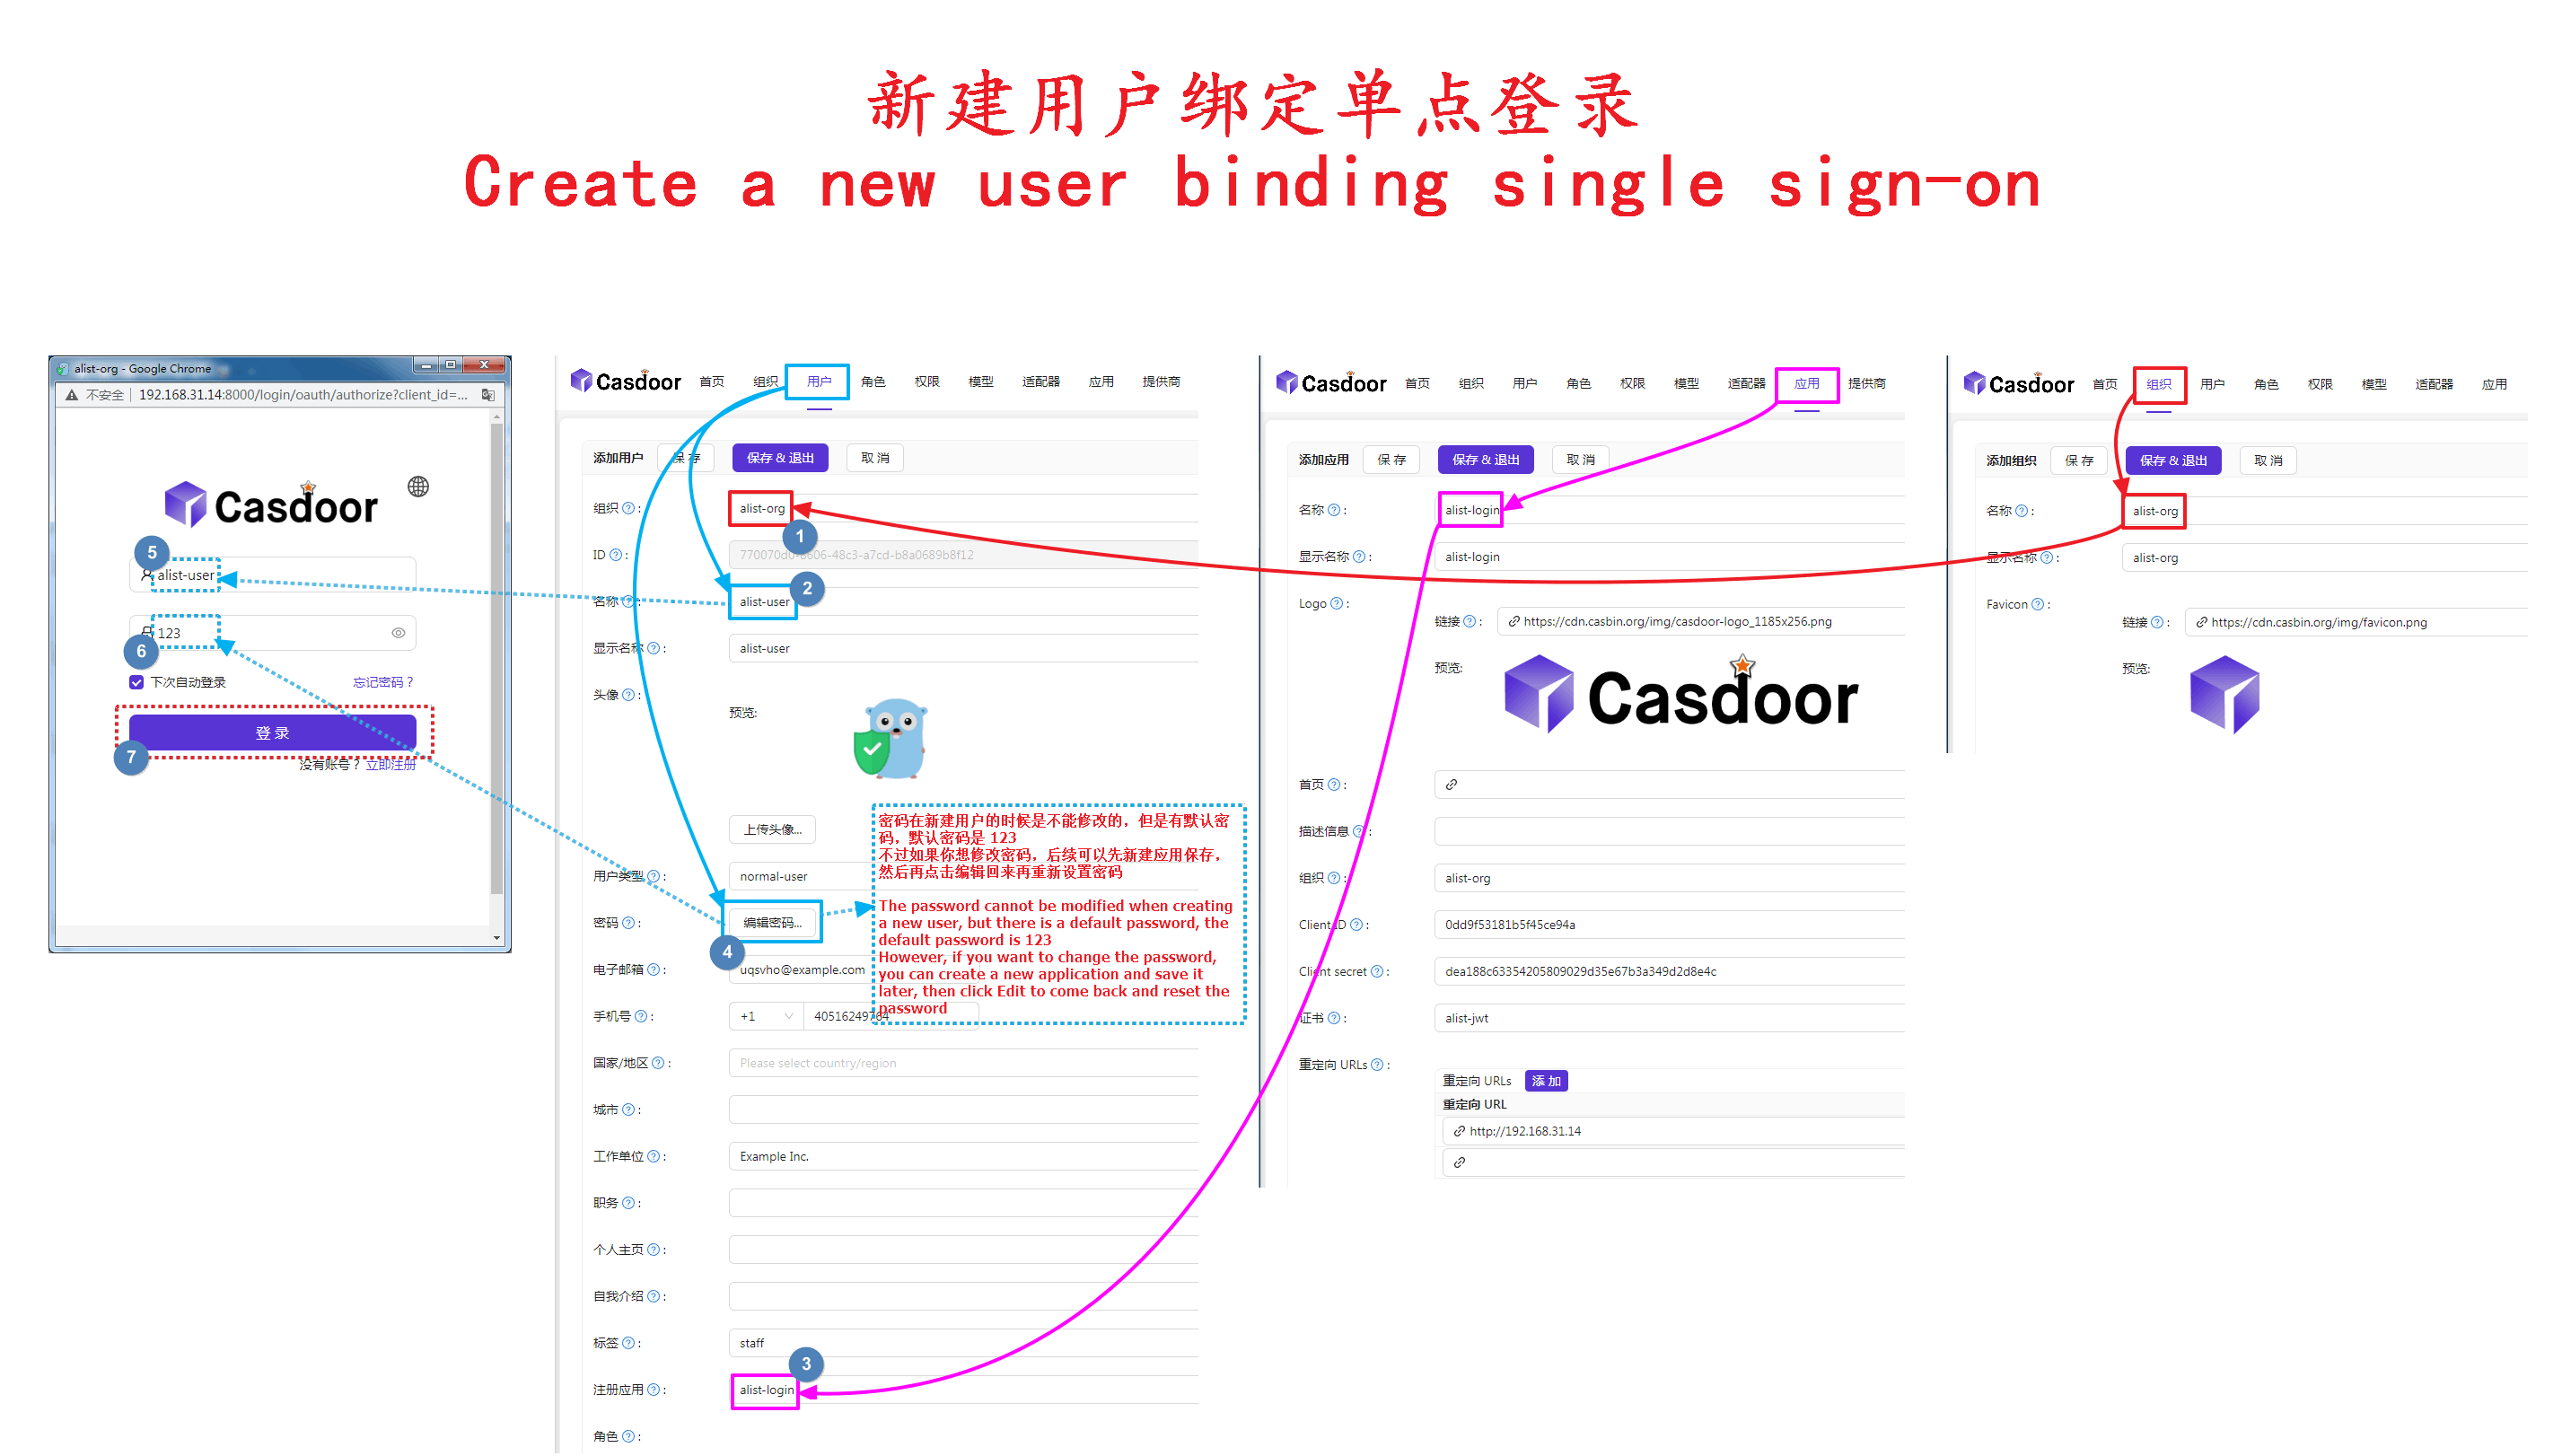
After we enter Casdoor, we first create Organization1, Token2, Application3, User4
Do not use the default organization (app-built-in) directly, because all users in this organization are global administrator accounts
Then fill in the OpenList backstage single sign-on option one by one. The user’s parameters are ignored for the time being. They are filled in when the personal data is bound to the single sign-on.
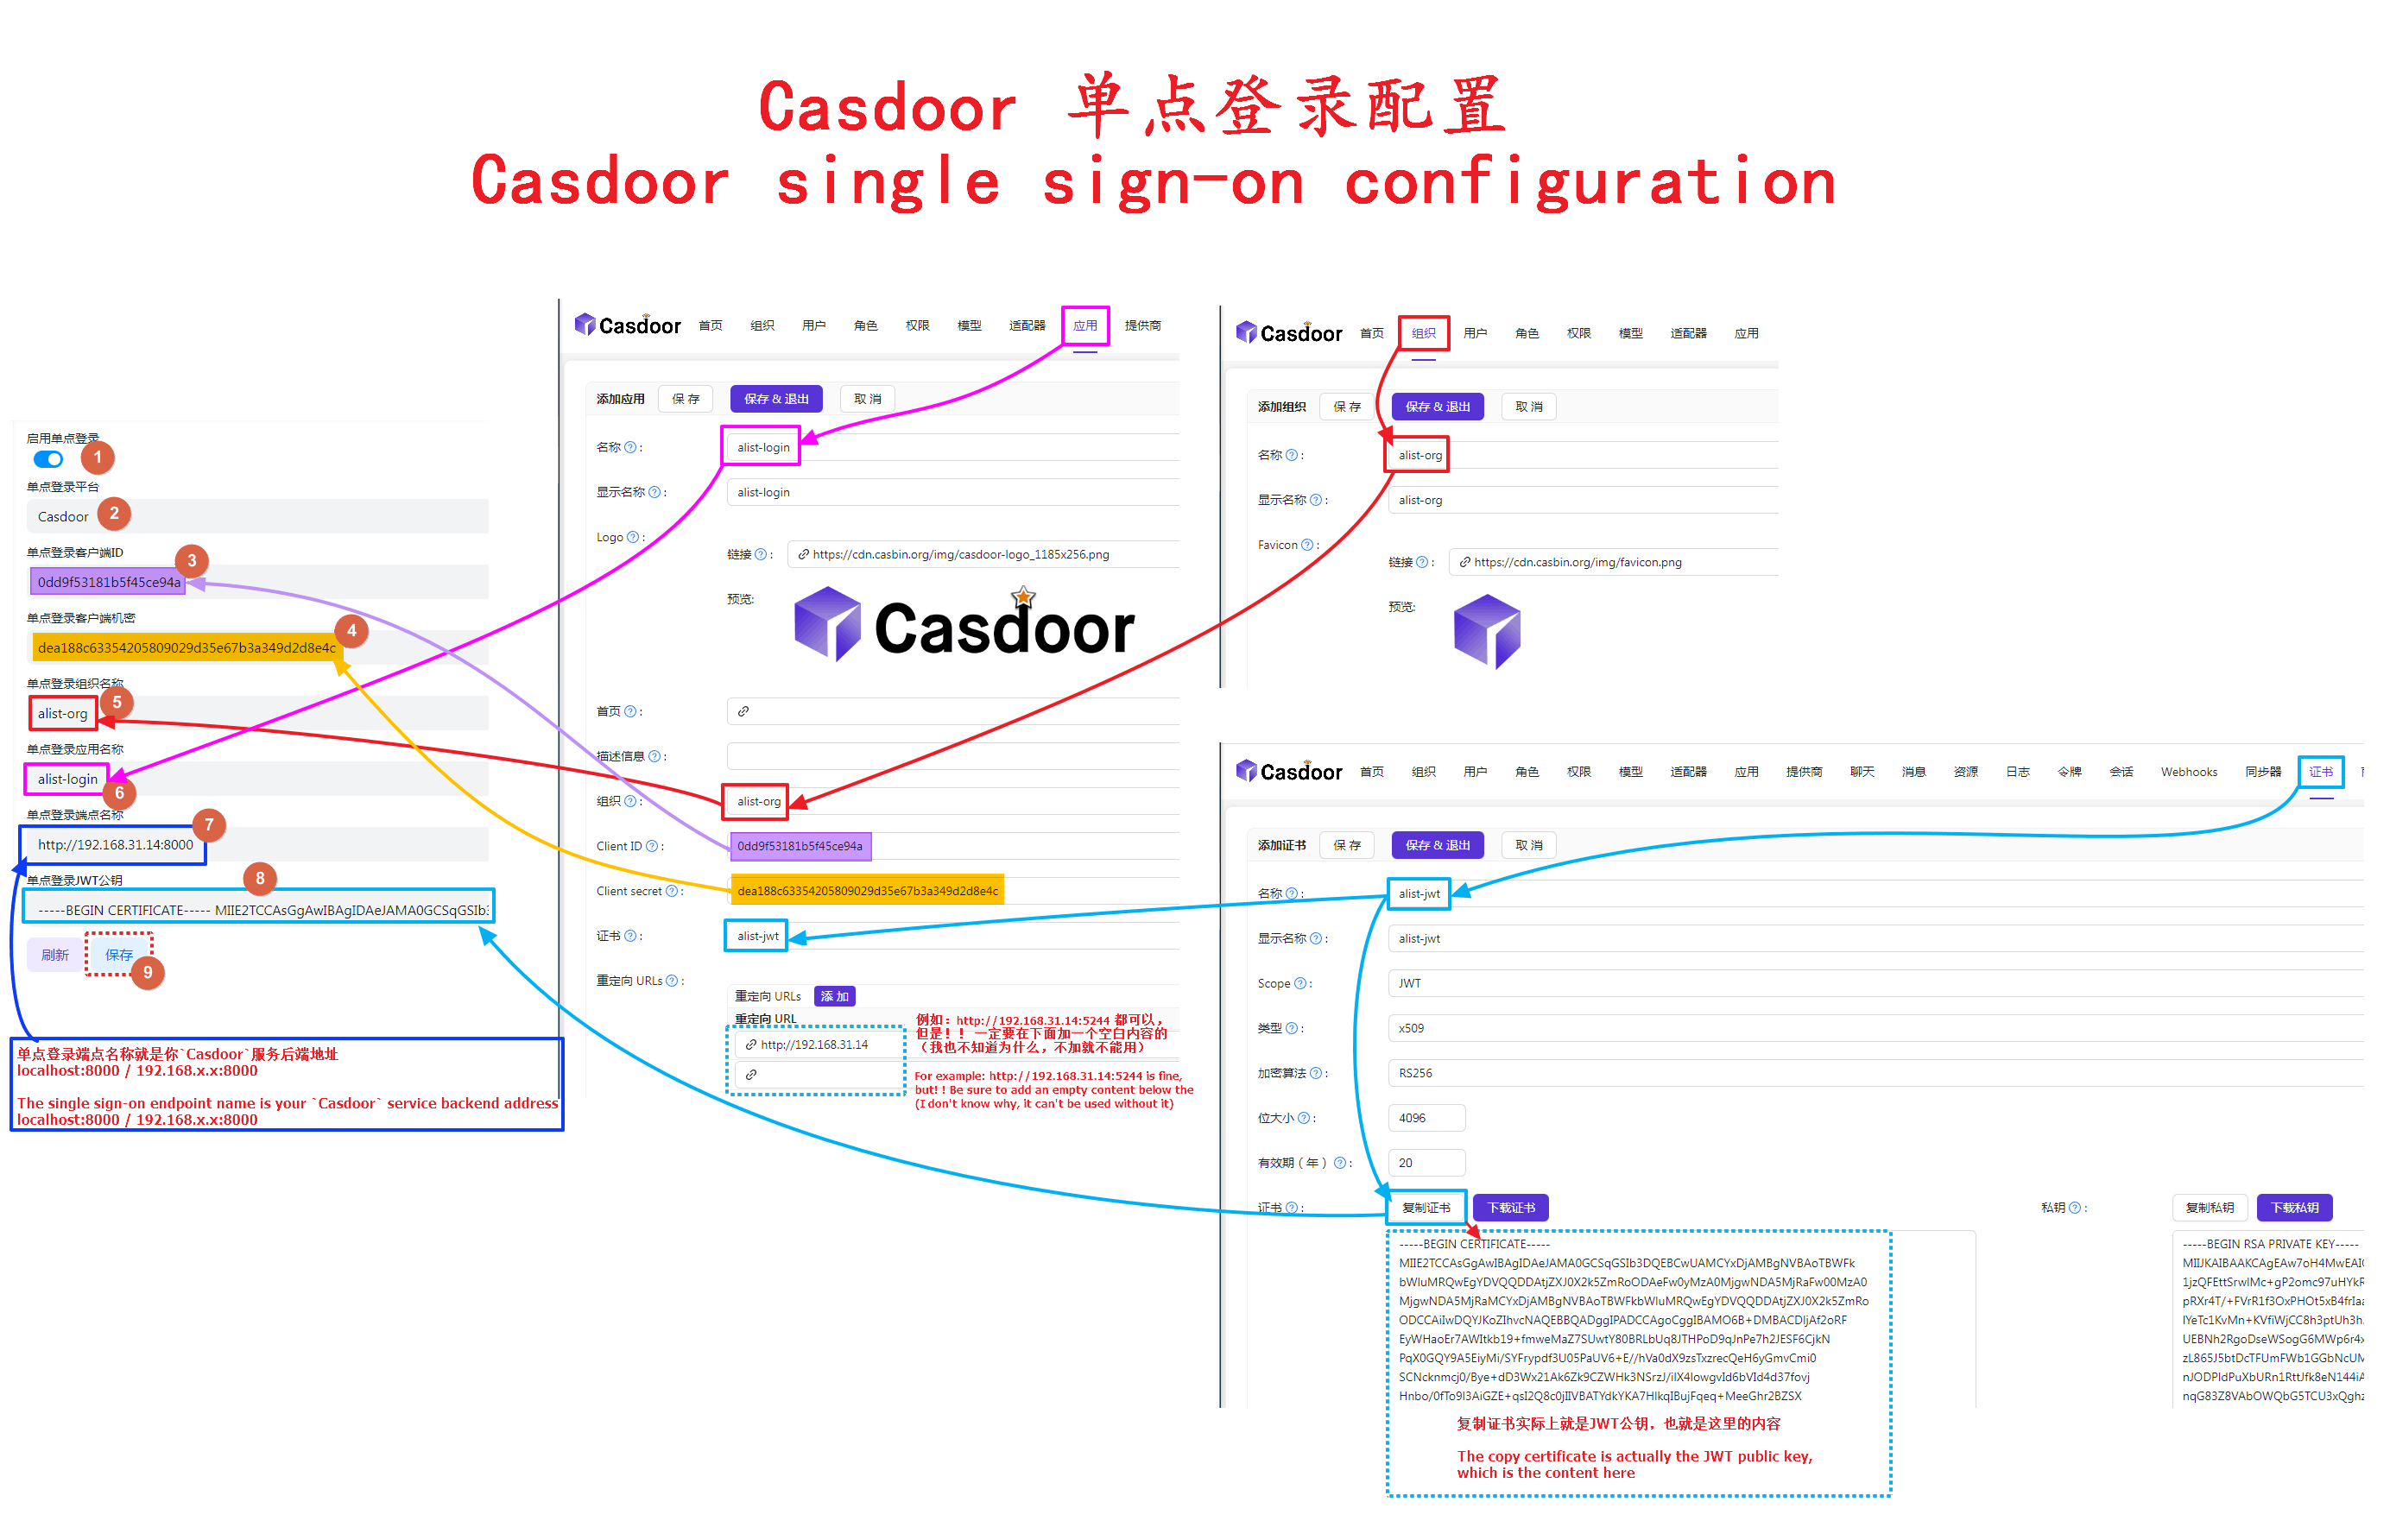
After filling in the above parameters, we come to the personal data and click Bind point single sign-on platform to bind
Then the Casdoor window will pop up, we can enter our registered user name
Casdoor 是什么? 是可以使用其他 OAuth 应用程序登录,自行部署开源免费,使用他们官方托管是需要付费的。
现在,Casdoor 支持许多OAuth 应用程序提供者,多达几十种,你见过的没见过的都有
GitHub开源链接:https://github.com/casdoor/casdoor
我们进入Casdoor后,首先分别新建一下 组织1,令牌2,应用3,用户4
请勿直接使用默认组织(app-built-in),因为这个组织内的用户都是全局管理员帐号
然后依次填写到OpenList后台单点登录选项内,用户的参数暂时不用管,是在个人资料绑定单点登录的时候填写的

以上参数填写好后,我们来到个人资料这里点击绑定点单登录平台,进行绑定
然后弹出Casdoor窗口,我们输入我们注册的用户名即可

3.5.1. Access some other vendors on Casdoor
3.5.1. 在Casdoor接入一些其他的厂商
In addition to the four that OpenList has already connected to GitHub Dingding Google Microsoft, it is also connected to QQ Baidu Feishu WeChat/Enterprise WeChat Douyin Bilibili and so on, all click Check out all the manufacturers that can be accessed here, of course, the four that OpenList has already accessed can also be added to Casdoor
View detailed tutorials on accessing other providers: https://anwen-anyi.github.io/index/09-ssologin.html
Direct iframe viewing
除了现在OpenList已经接入的 GitHub 钉钉 谷歌 微软这四个除外还接入QQ 百度 飞书 微信/企业微信 抖音 哔哩哔哩等等等个,全部的点击这里查看全部可以接入的厂商,当然了OpenList已经接入的四个也是可以添加到Casdoor
查看详细接入其它提供商教程: https://anwen-anyi.github.io/index/09-ssologin.html
直接 iframe 查看
3.6. Authentik
3.6.1. Authentik Setup
3.6.1. Authentik 设置
Create a Provider for OpenList
- Menu -> Applications -> Providers -> Create
- Select
OAuth2/OpenID Providerand click next - Enter an application name, this guide assumes you will call the provider
OpenList - Select your authorization flow. The built-in
default-provider-authorization-implicit-consentis acceptable - Make note of the
Client IDandClient Secretfields as provided by Authentik - save these values for later - For Redirect UDIs/Origins, enter the following, replacing [your.openlist.domain] with the FQDN for your OpenList installation:
https://your.openlist.domain/api/auth/sso_callback\?method=sso_get_token
https://your.openlist.domain/api/auth/sso_callback\?method=get_sso_id
Please note the \ character before ? as an escape character for the regex used for this URI is mandatory.
- Make note of the signing key selected as you will need it later. This guide assumes you will use the default
authentik Self-signed Certificate - Save the new provider
Create an Application for OpenList
- Menu -> Applications -> Application -> Create
- Enter an application name, recommended
OpenList - An application slug of
openlistwill be automatically selected for you. This guide assumes you will keep this value - Select the provider by name you selected in Provider Setup step 3 -
OpenList - Save the new application
Retrieve the JWT certificate
- Menu -> System -> Certificates
- Select the
>next to theauthentik Self-signed Certificate. If you chose another certificate for the application, select that certificate instead - Click Download Certificate to get a copy of the public JWT key
为 OpenList 创建提供程序
- 菜单 -> 应用程序 -> 提供程序 -> 创建
- 选择
OAuth2/OpenID 提供程序并点击下一步 - 输入应用程序名称,本指南假设你将提供程序命名为
OpenList - 选择授权流。内置的
default-provider-authorization-implicit-consent是可接受的 - 记下由 Authentik 提供的
Client ID和Client Secret字段—保存这些值以供后用 - 对于重定向的 UDI/来源,输入以下内容,将 [your.openlist.domain] 替换为你的 OpenList 安装的 FQDN:
https://your.openlist.domain/api/auth/sso_callback\?method=sso_get_token
https://your.openlist.domain/api/auth/sso_callback\?method=get_sso_id
请注意,? 前的 \ 字符作为正则表达式中 URI 的转义字符是必需的。- 记下所选的签名密钥,稍后会用到。假设你将使用默认的
authentik 自签名证书 - 保存新的提供程序
为 OpenList 创建应用程序
- 菜单 -> 应用程序 -> 应用程序 -> 创建
- 输入应用程序名称,建议使用
OpenList - 应用程序 slug 将自动选择为
openlist。本指南假设你会保留此值 - 选择在提供程序设置步骤 3 中选择的提供程序名称 —
OpenList - 保存新的应用程序
获取 JWT 证书
- 菜单 -> 系统 -> 证书
- 选择
>旁边的authentik 自签名证书。如果你为应用选择了其他证书,选择该证书 - 点击“下载证书”以获取公共 JWT 密钥的副本
3.6.2. OpenList Setup
3.6.2. OpenList 设置
- Sso login enabled:
yes - Sso login platform:
OIDC - Sso client id: [Client ID from Authentik]
- Sso client secret: [Client Secret from Authentik]
- Sso oidc username key:
preferred_username - Sso organization name:
user - Sso application name:
user - Sso endpoint name:
https://your.authentik.domain/application/o/openlist/- Note: Replace [your.authentik.domain] with the FQDN for your Authentik installation. Mind the trailing
/at the end of the path. If you chose a different application slug in Authentik Application setup 3, substitute that here
- Note: Replace [your.authentik.domain] with the FQDN for your Authentik installation. Mind the trailing
- Sso jwt public key: Open the certificate file downloaded in step 3.3 of the Authentik Application setup and paste the contents here. It will start with
-----BEGIN CERTIFICATE----- - Sso compatability mode:
no
启用 SSO 登录:
是SSO 登录平台:
OIDCSSO 客户端 ID: [来自 Authentik 的 Client ID]
SSO 客户端密钥: [来自 Authentik 的 Client Secret]
SSO OIDC 用户名键:
preferred_usernameSSO 组织名称:
userSSO 应用程序名称:
userSSO 端点名称:
https://your.authentik.domain/application/o/openlist/- 注意: 将 [your.authentik.domain] 替换为你的 Authentik 安装的 FQDN。注意路径末尾的斜杠
/。如果你在 Authentik 应用程序设置第 3 步选择了不同的应用程序 slug,请在此处替换
- 注意: 将 [your.authentik.domain] 替换为你的 Authentik 安装的 FQDN。注意路径末尾的斜杠
SSO JWT 公钥: 打开在 Authentik 应用程序设置第 3.3 步中下载的证书文件,并将内容粘贴在此处。它以
-----BEGIN CERTIFICATE-----开头SSO 兼容模式:
否
3.7. Keycloak
Keycloak 通过 OIDC(OpenID Connect)协议实现与 OpenList 的单点登录对接,可以作为 OpenList 的身份提供者,下面是配置步骤。
Keycloak is integrated via the OIDC (OpenID Connect) protocol and can serve as an identity provider for OpenList. The steps below explain how to configure Keycloak for OpenList SSO.
3.7.1. Keycloak 设置
3.7.1. Keycloak Setup
3.7.1.1. Create Realm
3.7.1.1. 新建 Realm
- 登录到 Keycloak 管理控制台。
- 在左侧导航栏点击
Manage realms,选择Create Realm新建领域,或选用现有领域。
- Log in to the Keycloak admin console.
- Click
Manage realmsin the left navigation bar, selectCreate Realmto create a new realm or use an existing one.
3.7.1.2. Create Client
3.7.1.2. 新建 Client
选择领域后,在左侧菜单中找到 Clients并且进入该页面,点击Create Client。
After selecting the realm, click Clients → Create Client.
General settings
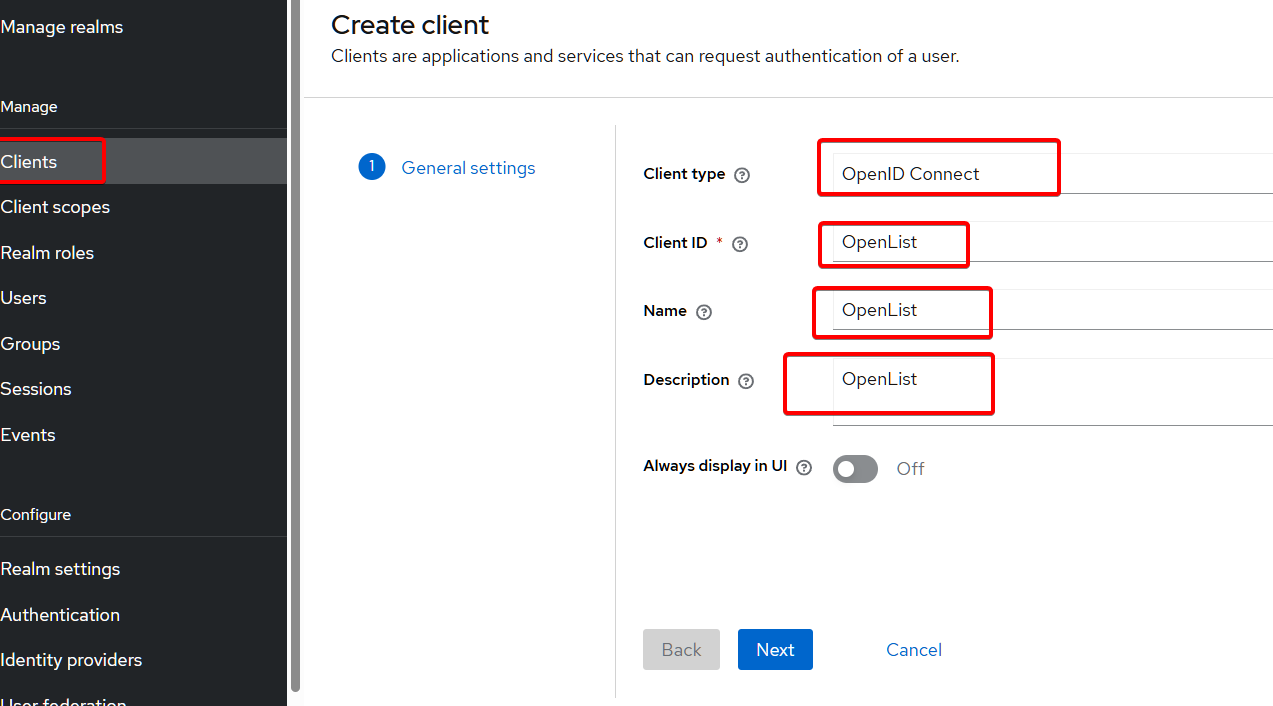
see the details
Name Value Client type OpenID Connect Client ID OpenList (or any name you prefer) Name OpenList (or any name you prefer) Description optional Always display in UI select as needed 查看详情
配置名 配置值 客户端类型 OpenID Connect 客户端ID OpenList(或你喜欢的任何名称) 名称 OpenList(或你喜欢的任何名称) 描述 可选 始终在 UI 中显示 根据需要选择 Capability config
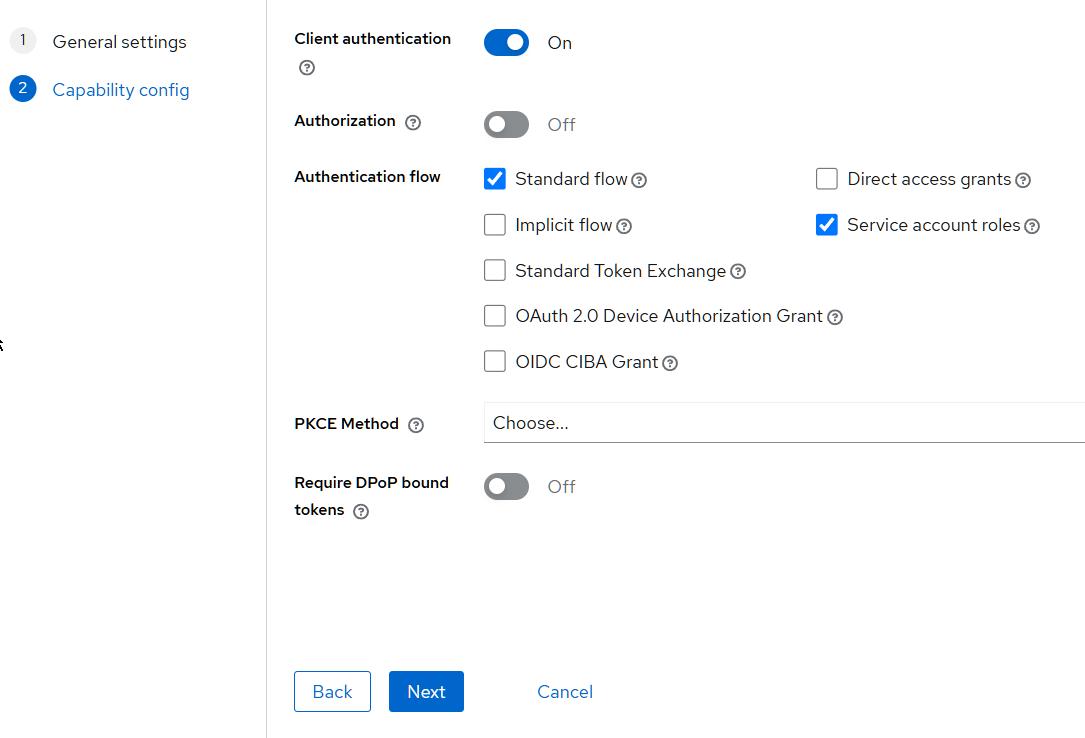
查看详情
配置名 配置值 Client authentication On Authorization Off Authentication flow Standard Flow,Service account rolesPKCE Method 留空 Require DPoP bound tokens Off see the details
Name Value Client authentication On Authorization Off Authentication flow Standard Flow,Service account rolesPKCE Method Leave blank Require DPoP bound tokens Off Login settings
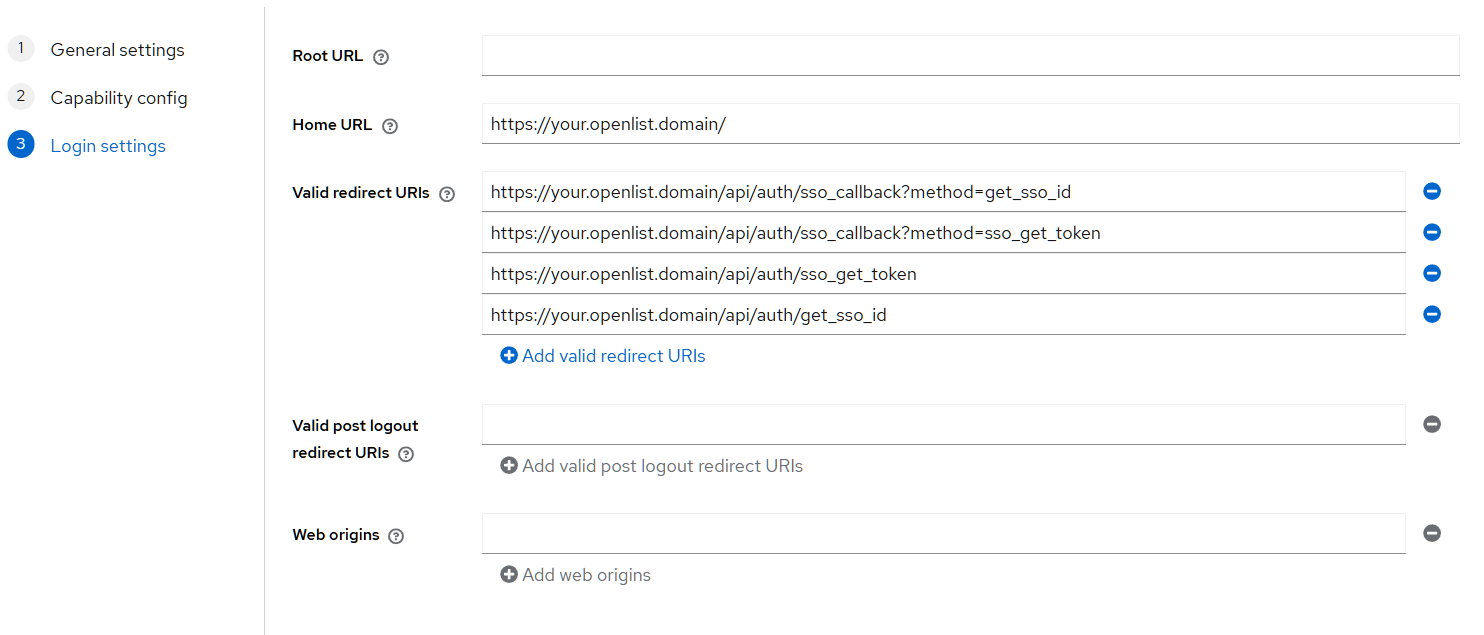
查看详情
配置名 配置值 Root URL 留空 Home URL 填入你OpenList的访问地址,如:https://your.openlist.domain Valid redirect URIs https://your.openlist.domain/api/auth/sso_callback?method=get_sso_idhttps://your.openlist.domain/api/auth/sso_callback?method=sso_get_tokenhttps://your.openlist.domain/api/auth/sso_get_tokenhttps://your.openlist.domain/api/auth/get_sso_idValid post logout redirect URIs 留空 Web origins 留空 see the details
Name Value Root URL Leave blank Home URL Enter your OpenList access address, e.g.: https://your.openlist.domain Valid redirect URIs https://your.openlist.domain/api/auth/sso_callback?method=get_sso_idhttps://your.openlist.domain/api/auth/sso_callback?method=sso_get_tokenhttps://your.openlist.domain/api/auth/sso_get_tokenhttps://your.openlist.domain/api/auth/get_sso_idValid post logout redirect URIs Leave blank Web origins Leave blank
3.7.1.3. 获取JWT公钥
3.7.1.3. Retrieve JWT public key
- 在左侧找到
Clients,选择刚创建的 Client 进入设置页面。 - 在 Client 设置页面,切换到
Keys选项卡。 - 在
Public Key字段中复制公钥内容,稍后在 OpenList 配置中使用。 - 如果没有看到公钥,可以点击
Generate RSA Keys生成
- In the left menu, find
Clients, select the newly created Client to enter the settings page. - In the Client settings page, switch to the
Keystab. - Copy the content in the
Public Keyfield for later use in OpenList configuration. - If the public key is not visible, click
Generate RSA Keysto generate it.
3.7.1.4. 获取Client Secret
3.7.1.4. Retrieve Client Secret
- 在 Client 设置页面,切换到
Credentials选项卡。 - 在
Client Secret字段中复制客户端密钥内容,稍后在 OpenList 配置中使用。
- In the Client settings page, switch to the
Credentialstab. - Copy the content in the
Client Secretfield for later use in OpenList configuration.
3.7.2. OpenList 设置
3.7.2. OpenList Setup
在 OpenList 的单点登录配置填写如下参数:
- 启用 SSO 登录:
是 - SSO 登录平台:
OIDC - SSO 客户端ID:Keycloak 客户端 ID(见上文新建 Client)
- SSO 客户端密钥:Keycloak 客户端 Secret(见上文获取Client Secret)
- SSO OIDC 用户名键:
preferred_username或按你的 Mapper 设置 - SSO 组织名称:
master(与上文新建 Realm名称对应) - SSO 应用名:
OpenList(见上文新建 Client) - SSO 端点名称:
https://your.keycloak.domain/realms/{realm-name}(realm-name与组织名一致) - SSO JWT 公钥:见上文获取JWT公钥
- 自动注册为 OpenList 帐号:根据需要开启
- SSO 兼容模式:
否(如果需要兼容可开启)
如有特殊需求,根据实际 Keycloak 部署调整 claims 和端点。
详细操作请参考 Keycloak 官方 OIDC 文档。
Fill in the following parameters in OpenList’s SSO configuration:
- SSO login enabled:
yes - SSO login platform:
OIDC - SSO client id: Keycloak Client ID (from Create Client above)
- SSO client secret: Keycloak Client Secret (from Retrieve Client Secret above)
- SSO oidc username key:
preferred_usernameor as per your Mapper settings - SSO organization name:
master(from Create Realm above) - SSO application name:
OpenList(from Create Client above) - SSO endpoint name:
https://your.keycloak.domain/realms/{realm-name}(where realm-name matches the organization name) - SSO jwt public key: from Retrieve JWT public key above
- SSO auto register as OpenList account: Enable as needed
- SSO compatibility mode:
no(enable if compatibility is required)
Adjust claims and endpoints based on your specific Keycloak deployment if needed. For detailed operations, refer to the Keycloak official OIDC documentation.
4. SSO automatically registers as an OpenList account
4. 单点登录自动注册为OpenList帐号
- OpenList Version > v3.22.1 New Features Before using single sign-on to register as an OpenList account, we need to bind the single sign-on of OpenList first, the binding method is explained above
- Supports the
fivesingle sign-on methods mentioned above - Do not use the default organization (app-built-in) directly, because all users in this organization are global administrator accounts
- Except
CASDOOR, you only need to fill in theClient idand theClient secretsand the newly added single login account registered as OpenList account configuration
- OpenList 版本 > v3.22.1 新增功能 在使用单点登录注册为OpenList帐号前,我们需要先将OpenList的单点登录进行绑定,绑定方法在上面有说明
- 支持上述提到的
五个单点登录方法 - 如果使用
Casdoor,请勿直接使用默认组织(app-built-in),因为这个组织内的用户都是全局管理员帐号 - 除了
Casdoor其它的只需要填写客户端ID和客户端秘钥以及下面新增的单点登录帐号注册为OpenList帐号的配置
4.1. SSO Full Fill Demo
4.1. SSO完整填写示例
Please refer to the detailed description below for how to fill in, the schematic diagram is just a reference for filling in and not suitable for everyone’s user habits
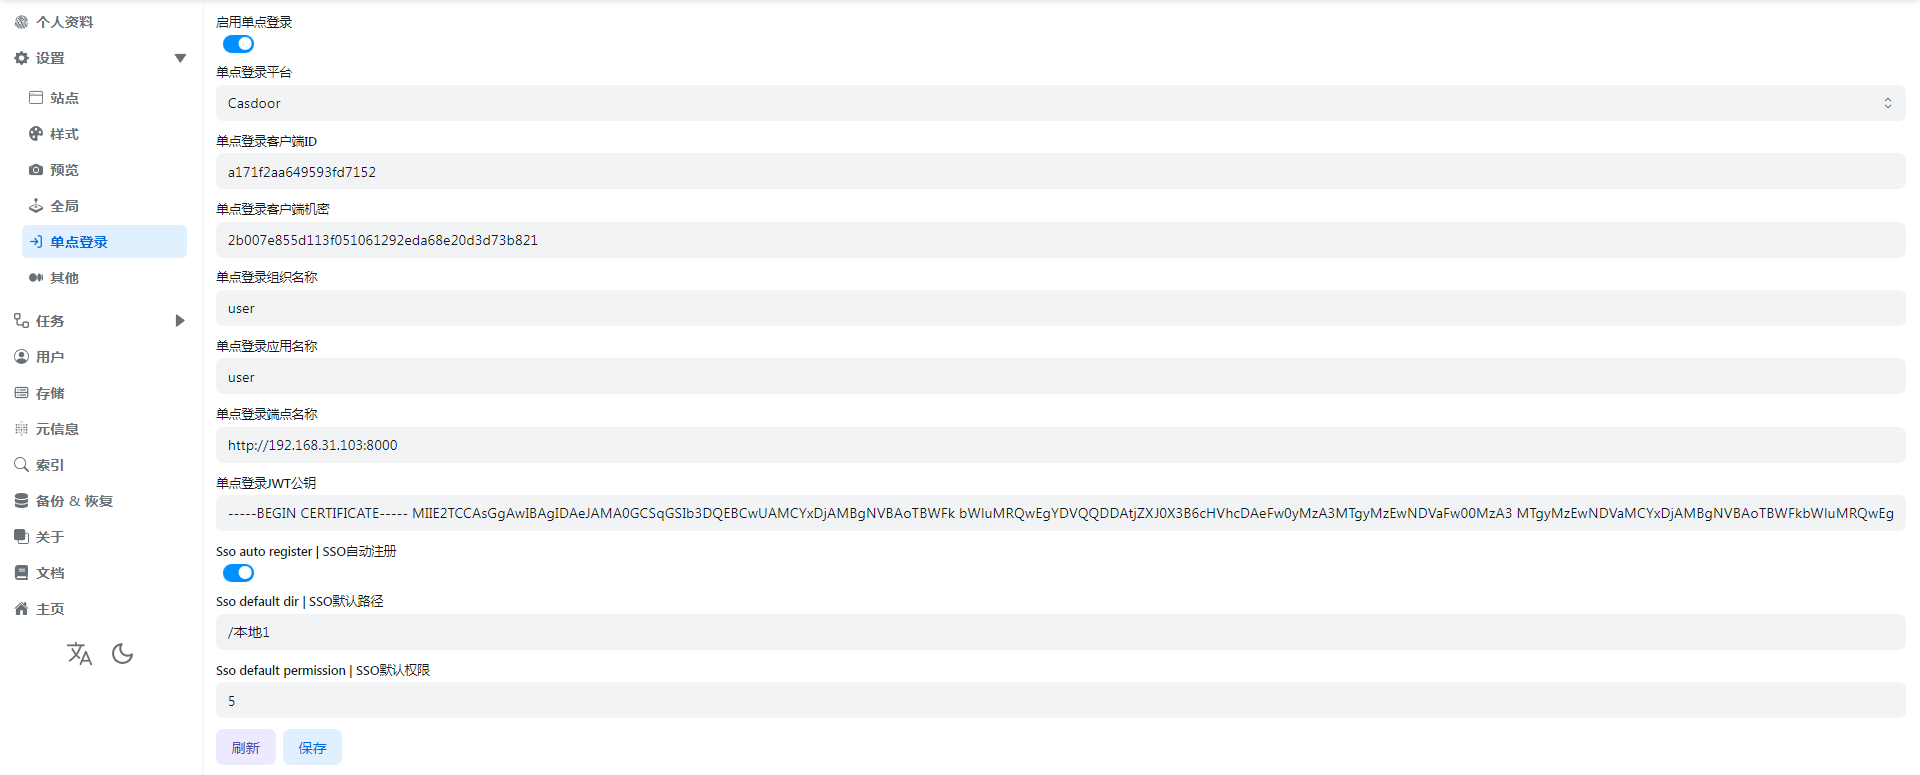
分别如何填写看下面的详细说明,示意图只是一个填写参考并不适合每个人的用户习惯

4.2. SSO auto register
4.2. SSO自动注册
If we want SSO single sign-on to be registered as an OpenList account, we need to enable this option before it can be used
如果我们想让SSO单点登录注册为OpenList帐号我们需要打开这个选项才可以使用
4.3. SSO default dir
4.3. SSO默认路径
That is to say, the default path used by the registered account is equivalent to the Base path in the OpenList user settings.
It can be the root directory /, or the path /path/test/Demo specified by the user

也就是说注册的帐号默认使用的路径,相当于OpenList用户设置里面的基本路径
可以是根目录/,也可以是用户指定的路径/path/test/Demo

4.4. SSO default permission
4.4. SSO默认权限
It is equivalent to which permissions are enabled by default for registered users, as shown below


The default is 0, no permission is enabled
If we need to enable some permissions during registration, we only need the sum of the numbers of different permissions.
For example:
- We need to open the user’s
WebDav readingandWebDav manageby default, that is 256+512=768, we just fill in768in the options - If we need to open the three permissions of
Make dir or upload,RenameandDeleteby default when registering, then it is 8+16+128=152, we can fill in152in the background I won’t say much about the examples, just add the permissions you need
相当于注册的用户默认开通哪些权限,就如下面所示的 
 默认为0,不开通任何权限 如果在注册时我们需要开通一些权限我们只需要不同权限的数字相加即可 例如:
- 我们需要默认开通用户的
WebDav读取和WebDav管理那就是256+512=768,我们就在填写选项填写768即可 - 如果我们需要注册时默认开通
创建目录或上传和重命名和删除这三个权限 那就是8+16+128=152,我们在后台填写152即可 例子就不多说了,需要那个权限自己相加就可以
4.5. Precautions and instructions
4.5. 注意事项以及说明
4.1-There is already this user in the OpenList user database
| username | password | base*path | role | permission | opt_secret | github_id | disabled | sso_id |
|---|---|---|---|---|---|---|---|---|
| anyi | FzdDfkmU | /test1 | 0 | 3 | 0 | |||
| anyi***dc188911** | RUCtgqCw | /test1 | 0 | 3 | 0 | dc18891 |
As shown in the above table, a string of redundant ids is added after the newly registered single sign-on user name
This is because the same user already exists in the OpenList user database, so the sso_id is also added after the user name
If your newly registered single sign-on user name does not exist in the OpenList user database, it will not add the sso_id after the name
4.2-What should I do if I don’t want the SSO account to be registered as an OpenList account?
Just turn SSO auto register off,This will not affect the use of accounts that have been registered using Sso
4.3-If I turn off the single sign-on option, what should I do with the account registered with Sso?
Don’t worry, after using single sign-on to register and log in to OpenList, log in in the background, and find personal information after logging in
- You can modify
usernameandpasswordby yourself, save it after modification, so that you can log in with the OpenList account normally - At this time, you can click
Unbind Single Sign-On Platform, you can unbind or not unbind, and the subsequent default path and default permissions of this user can only be modified by the administrator in the OpenList background user
4.4-Why is this error code displayed when using sso?
{
    "code": 400,
    "message": "The single sign on platform is not bound to any users: record not found",
    "data": null
}
This is because Single Sign-On Automatic Registration is not enabled for the OpenList account, and the single sign-on cannot be registered as an OpenList account
If you are an administrator, you can turn it on
If you are a user, you can contact the administrator to enable
4.1-OpenList用户数据库已存在同名的帐号
| username | password | base_path | role | permission | opt_secret | github_id | disabled | sso_id |
|---|---|---|---|---|---|---|---|---|
| anyi | FzdDfkmU | /本地1 | 0 | 3 | 0 | |||
| anyi_dc188911 | RUCtgqCw | /本地1 | 0 | 3 | 0 | dc18891 |
如上表格所示,新注册的单点登录用户名称后增加了一串多余的id
这是因为OpenList用户数据库中已有了相同的用户,所以在用户名后把单点登录ID也添加上去了
如果你新注册的单点登录用户名在OpenList用户数据库中没有,它就不会在名字后面添加单点登录ID
4.2-如果不想让单点登录的帐号注册为OpenList帐号了怎么办?
把Sso自动注册关闭就可以,这样不影响已经使用单点登录注册好的帐号使用
4.3-如果我把单点登录选项关闭,使用单点登录注册的帐号怎么办?
不用担心,使用单点登录注册好登录OpenList后,在后台登录,登录好后找到个人资料
- 可以自行修改
用户名和密码,修改好后保存,这样就可以正常使用OpenList帐号来登录了 - 这时候可以点击
解绑单点登录平台了,解绑和不解绑都可以,后续该用户的默认路径和默认权限只能通过管理员在OpenList后台用户进行修改
4.4-使用单点登录提示这个错误码是怎么回事?
{
    "code": 400,
    "message": "The single sign on platform is not bound to any users: record not found",
    "data": null
}这是因为单点登录自动注册为OpenList帐号的选项没开启,无法将单点登录注册为OpenList帐号
- 如果你是管理员,你可以开启一下
- 如果你是用户,你可以去联系管理员开启
5. Sso compatibility mode
5. SSO兼容模式
OpenList single -point login is bound to Dingtalk, and then opens OpenList in the Dingtalk application, When you log in, choose Dingtalk login and jump to your computer browser. After authorization, you find that there is no response, because the browser cannot jump to the Dingtalk application inner browser page
At this time, you need to open the sso compatability mode again to click on the login to log in successfully
OpenList applied in Dingtalk and opened as shown in the figure:
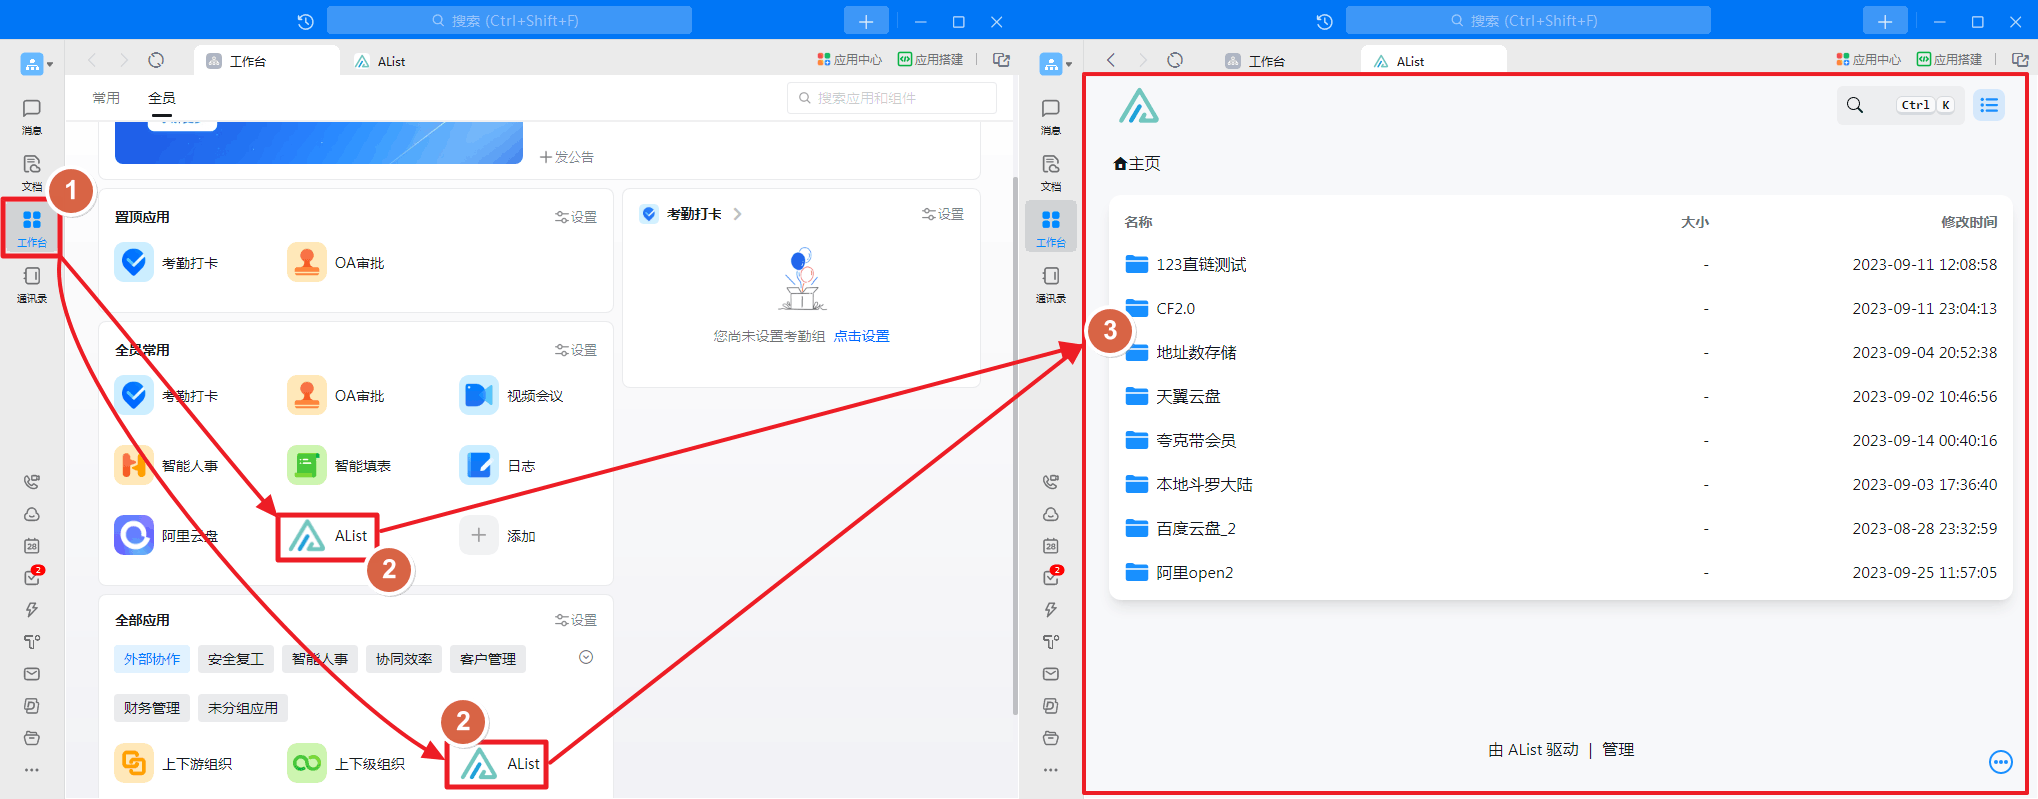
OpenList单点登录绑定了钉钉,然后在 钉钉 应用内打开OpenList,登录时选择钉钉登录会跳到自己电脑浏览器,授权后你会发现没有后续反应了,因为浏览器无法跳回钉钉应用內浏览器页面
这时候就需要打开 SSO兼容模式 再去点击登录就可以登录成功了
OpenList应用在钉钉软件内打开如图所示:

6. How to create the application in Dingtalk workbench
6. 如何创建钉钉工作台內应用
A picture teaches you to create a new application and add it
- LOGO is not modified when the newly -built newly built, you can wait for the newly built and then modify See_Figure_2
- If you just browse OpenList in the Dingtalk application, you do n’t need a single -point login management, you do n’t need to set up a single -point login configuration, you can just add an application

一张图教你新建一个应用并且添加
- LOGO是默认的新建时不可修改,可以等新建好后再修改 (看图二)
- 如果你只是在钉钉应用內浏览OpenList,不使用单点登录后台管理,可以不用设置单点登录配置只添加应用就可以

6.1. Modify the application logo
6.1. 修改应用LOGO
Open DingTalk open platform management Find your newly built app to modify the logo.

打开 钉钉开放平台后台 找到你新建的应用进去修改LOGO就可以

7. redirect url
7. 回调参数(重定向链接)
After turning on Sso compatibility mode Then you need to log in to the corresponding software to modify the redirect url to change it to the two redirect url below
GitHubonly needs to add one:http(s)://You_Url/api/auth/sso_get_tokenMicrosoftandGoogleboth need to be added, you can add multiple Redirect urls, so you only need to add two Redirect URLs.
http(s)://You_Url/api/auth/get_sso_id
http(s)://You_Url/api/auth/sso_get_token
If you enable the Sso compatibility mode if you do not modify it, you will prompt Invalid Redirect URL Error
开启 SSO兼容模式 后需要将单点登录对应的软件内修改一下回调参数链接改成下面的两个回调参数
GitHub只需要添加一条:http(s)://You_Url/api/auth/sso_get_token微软和谷歌两个都需要添加,可以添加多个,所以只需要新增两条就可以不用删除旧的
http(s)://You_Url/api/auth/get_sso_id
http(s)://You_Url/api/auth/sso_get_token
如果启用 SSO兼容模式 不修改则会提示 invalid redirect url 错误